Developer Guide
- Acknowledgements
- Setting up, getting started
- Design
-
Implementation
- Implementation of patient commands
- Find patient by illness feature
- Implementation of appointments commands
- View all appointments feature
- Cancel feature
- Schedule feature
- Reschedule feature
- Find patient appointments feature
- Display upcoming appointments feature
- Sort patients/appointment features
- Diagnose/Undiagnose Feature
- Undo/Redo Feature
- Documentation, logging, testing, configuration, dev-ops
- Appendix: Requirements
-
Appendix: Instructions for manual testing
- Launch and shutdown
- Adding a patient
- Deleting a patient
- Updating a patient’s details
- Diagnosing a patient
- Undiagnosing a patient
- Finding patients
- Sorting patients
- Viewing all patients
- Scheduling a new appointment
- Rescheduling an appointment
- Triaging an appointment
- Cancelling an appointment
- Displaying all appointments
- Finding appointments by patient name
- Displaying today’s appointments
- Displaying upcoming appointments
- Sorting appointments
- Undoing a command
- Redoing a command
- Listing all records
- Clearing all records
- Toggling dark/light mode
- Exiting the program
- Viewing help
- Appendix: Planned Enhancements
- Appendix: Effort
Acknowledgements
- Libraries used: JavaFX, Jackson, JUnit5
- This project is based on the AddressBook-Level3 project created by the SE-EDU initiative.
- The logo for the application is taken from here: Hospital icons created by Pixel Buddha - Flaticon
Setting up, getting started
Refer to the guide Setting up and getting started.
Design
.puml files used to create diagrams in this document docs/diagrams folder. Refer to the PlantUML Tutorial at se-edu/guides to learn how to create and edit diagrams.
Architecture
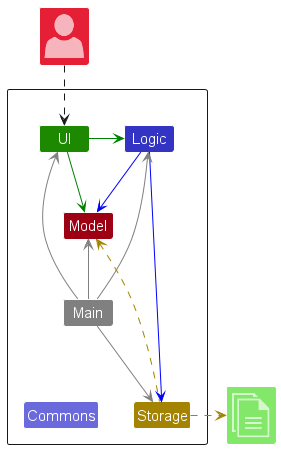
The Architecture Diagram given above explains the high-level design of the App.
Given below is a quick overview of main components and how they interact with each other.
Main components of the architecture
Main (consisting of classes Main and MainApp) is in charge of the app launch and shut down.
- At app launch, it initializes the other components in the correct sequence, and connects them up with each other.
- At shut down, it shuts down the other components and invokes cleanup methods where necessary.
The bulk of the app’s work is done by the following four components:
-
UI: The UI of the App. -
Logic: The command executor. -
Model: Holds the data of the App in memory. -
Storage: Reads data from, and writes data to, the hard disk.
Commons represents a collection of classes used by multiple other components.
How the architecture components interact with each other
The Sequence Diagram below shows how the components interact with each other for the scenario where the user issues the command delete 1.
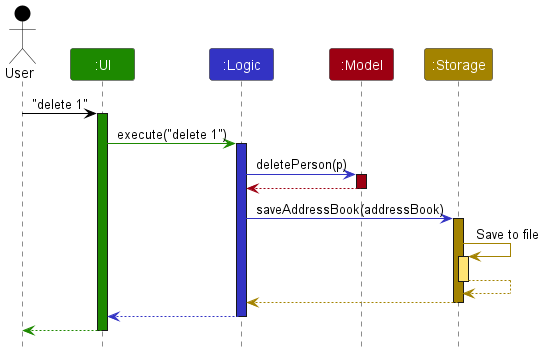
Each of the four main components (also shown in the diagram above),
- defines its API in an
interfacewith the same name as the Component. - implements its functionality using a concrete
{Component Name}Managerclass (which follows the corresponding APIinterfacementioned in the previous point).
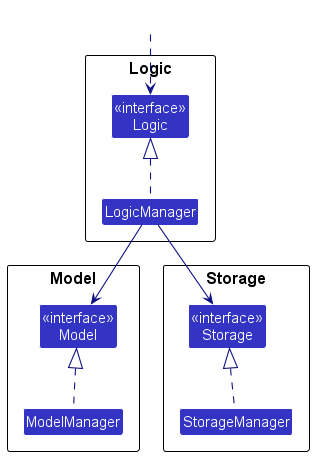
For example, the Logic component defines its API in the Logic.java interface and implements its functionality using the LogicManager.java class which follows the Logic interface. Other components interact with a given component through its interface rather than the concrete class (reason: to prevent outside component’s being coupled to the implementation of a component), as illustrated in the (partial) class diagram below.
The sections below give more details of each component.
UI component
The API of this component is specified in Ui.java
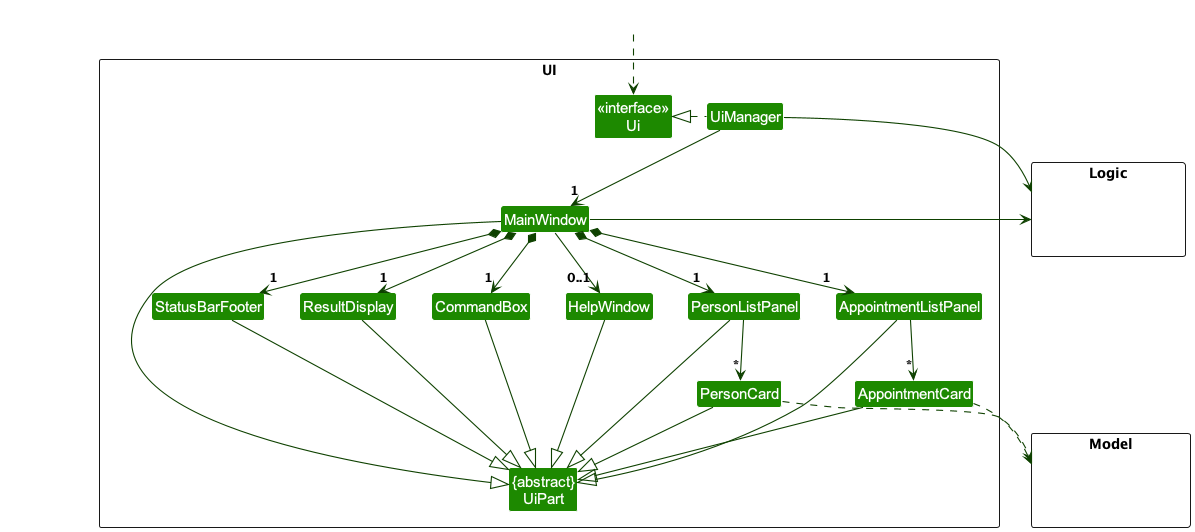
The UI consists of a MainWindow that is made up of parts e.g.CommandBox, ResultDisplay, PersonListPanel, StatusBarFooter etc. All these, including the MainWindow, inherit from the abstract UiPart class which captures the commonalities between classes that represent parts of the visible GUI.
The UI component uses the JavaFx UI framework. The layout of these UI parts are defined in matching .fxml files that are in the src/main/resources/view folder. For example, the layout of the MainWindow is specified in MainWindow.fxml
The UI component,
- executes user commands using the
Logiccomponent. - listens for changes to
Modeldata so that the UI can be updated with the modified data. - keeps a reference to the
Logiccomponent, because theUIrelies on theLogicto execute commands. - depends on some classes in the
Modelcomponent, as it displaysPersonobject residing in theModel.
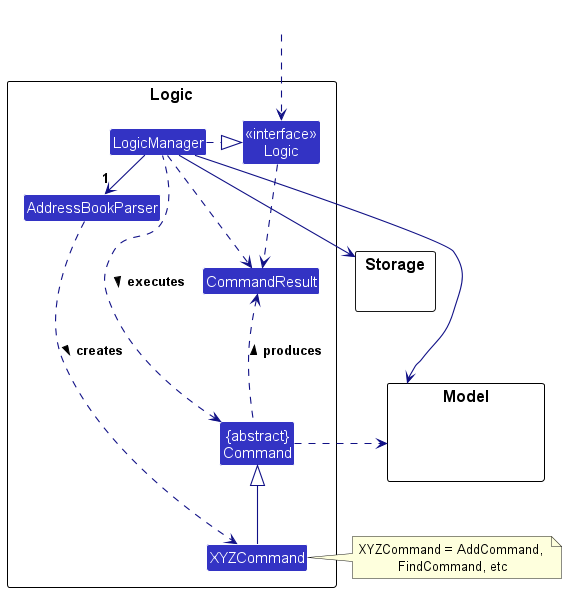
Logic component
API : Logic.java
Here’s a (partial) class diagram of the Logic component:
The sequence diagram below illustrates the interactions within the Logic component, taking execute("delete 1") API call as an example.
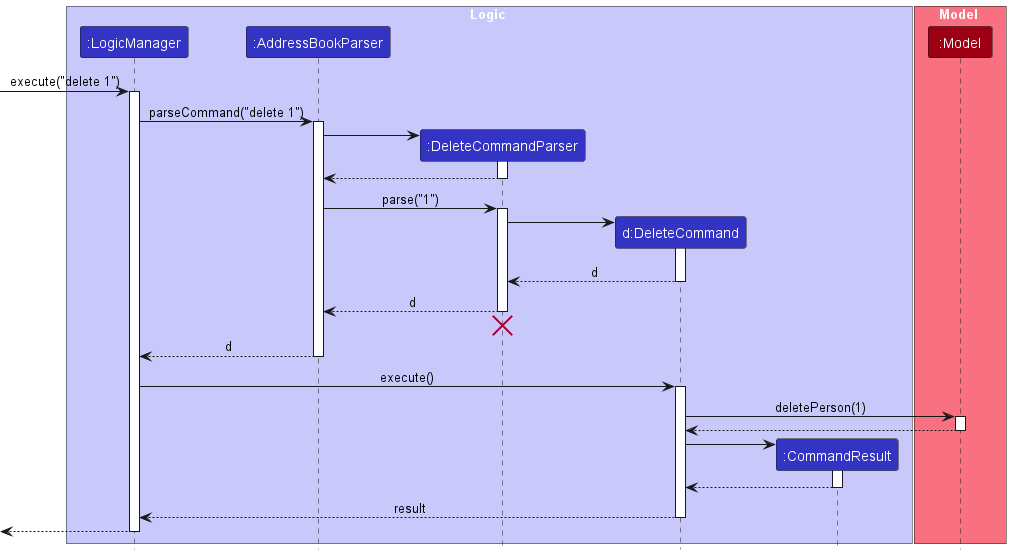
DeleteCommandParser should end at the destroy marker (X) but due to a limitation of PlantUML, the lifeline reaches the end of diagram.
How the Logic component works:
- When
Logicis called upon to execute a command, it is passed to anAddressBookParserobject which in turn creates a parser that matches the command (e.g.,DeleteCommandParser) and uses it to parse the command. - This results in a
Commandobject (more precisely, an object of one of its subclasses e.g.,DeleteCommand) which is executed by theLogicManager. - The command can communicate with the
Modelwhen it is executed (e.g. to delete a person). - The result of the command execution is encapsulated as a
CommandResultobject which is returned back fromLogic.
Here are the other classes in Logic (omitted from the class diagram above) that are used for parsing a user command:
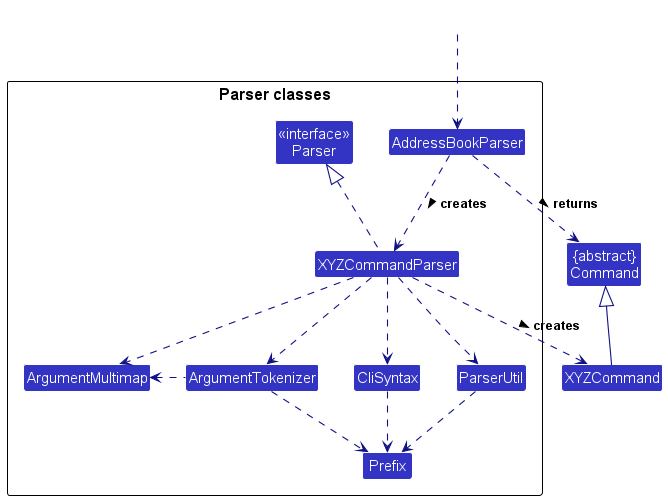
How the parsing works:
- When called upon to parse a user command, the
AddressBookParserclass creates anXYZCommandParser(XYZis a placeholder for the specific command name e.g.,AddCommandParser) which uses the other classes shown above to parse the user command and create aXYZCommandobject (e.g.,AddCommand) which theAddressBookParserreturns back as aCommandobject. - All
XYZCommandParserclasses (e.g.,AddCommandParser,DeleteCommandParser, …) inherit from theParserinterface so that they can be treated similarly where possible e.g, during testing.
Model component
API : Model.java
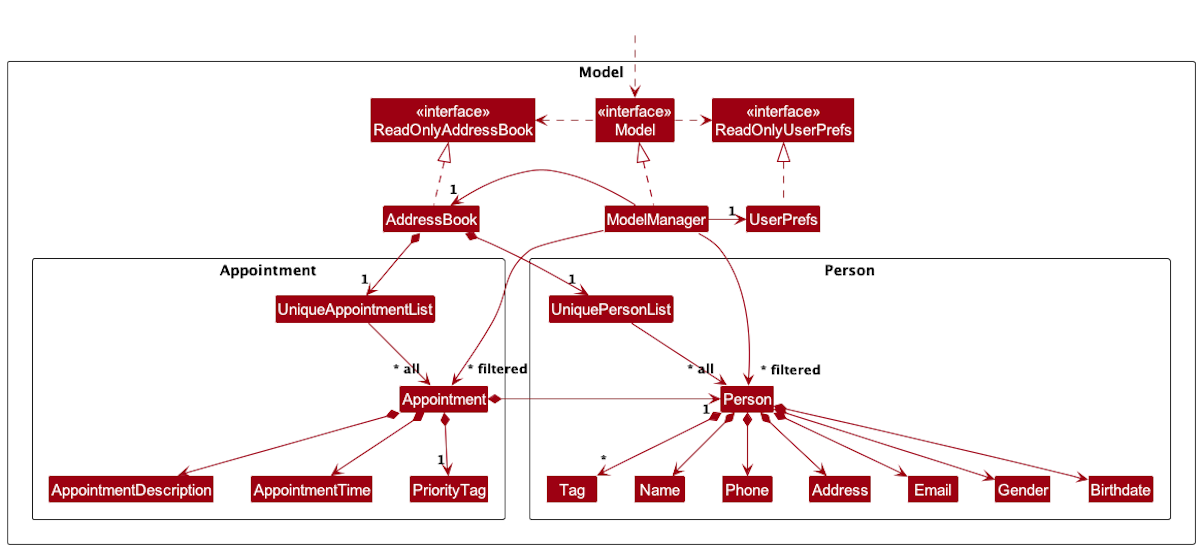
The Model component,
- stores the address book data i.e., all
Personobjects (which are contained in aUniquePersonListobject). - stores the currently ‘selected’
Personobjects (e.g., results of a search query) as a separate filtered list which is exposed to outsiders as an unmodifiableObservableList<Person>that can be ‘observed’ e.g. the UI can be bound to this list so that the UI automatically updates when the data in the list change. - stores a
UserPrefobject that represents the user’s preferences. This is exposed to the outside as aReadOnlyUserPrefobjects. - does not depend on any of the other three components (as the
Modelrepresents data entities of the domain, they should make sense on their own without depending on other components)
Tag list in the AddressBook, which Person references. This allows AddressBook to only require one Tag object per unique tag, instead of each Person needing their own Tag objects.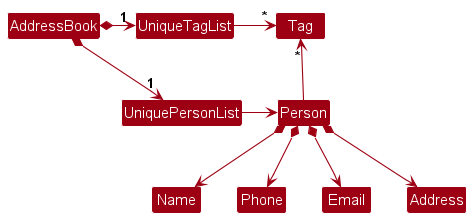
Storage component
API : Storage.java
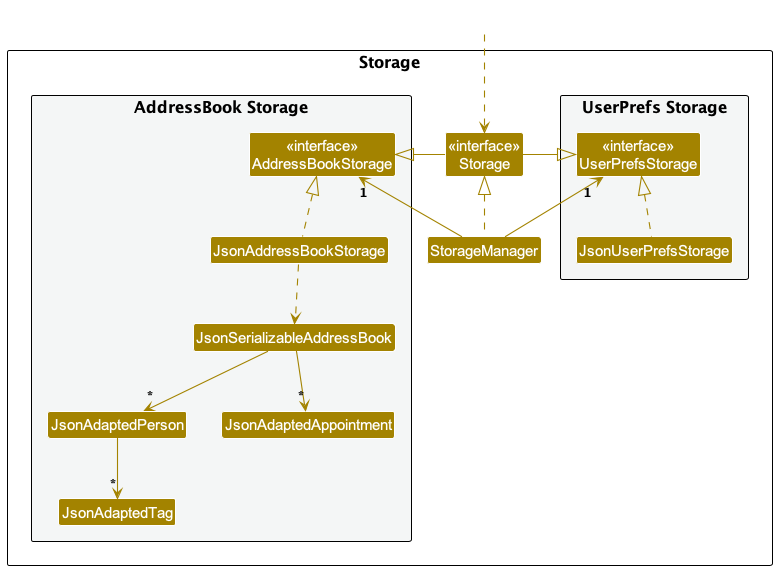
The Storage component,
- can save both address book data and user preference data in JSON format, and read them back into corresponding objects.
- inherits from both
AddressBookStorageandUserPrefStorage, which means it can be treated as either one (if only the functionality of only one is needed). - depends on some classes in the
Modelcomponent (because theStoragecomponent’s job is to save/retrieve objects that belong to theModel)
Common classes
Classes used by multiple components are in the seedu.addressbook.commons package.
Implementation
This section describes some noteworthy details on how certain features are implemented.
Implementation of patient commands
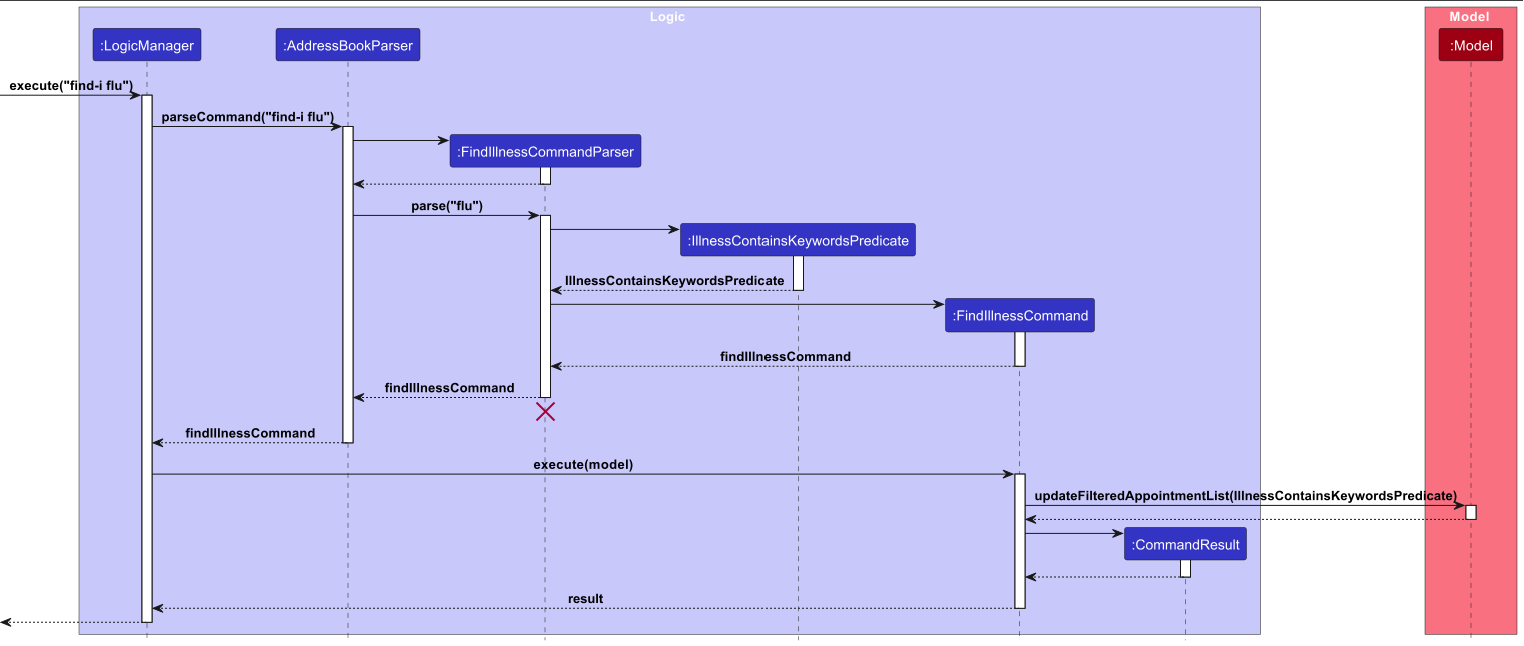
Find patient by illness feature
Implementation
For Find Illness command, the noteworthy classes are:
-
LogicManager.java- Calls the address book parser. -
AddressBookParser.java- For passing the arguments toFindIllnessCommandParser. -
FindIllnessCommandParser.java- For passing the arguments toFindIllnessCommand. -
FindIllnessCommand.java- For execution of the find illness command.
Let’s take a valid user input, find-i flu, as an example.
– user input: find-i flu –
Step 1. Logic Manager parses the user input through the AddressBookParser.
– AddressBookParser –
Step 2. AddressBookParser identifies the command word find-i.
Step 3. Returns FindIllnessCommandParser().parse(arguments) (in this case arguments = flu)
– FindIllnessCommandParser –
Step 4. FindIllnessCommandParser takes in arguments (flu) and uses the arguments to create the IllnessContainsKeywordsPredicate object.
Step 5. Returns a FindIllnessCommand object which takes in the IllnessContainsKeywordsPredicate object as a parameter.
– FindIllnessCommand –
Step 6. The IllnessContainsKeywordsPredicate object is saved in the FindIllnessCommand object.
– LogicManager –
Step 7. The FindIllnessCommand object is returned and its execute(model) method is triggered.
Step 8. The filtered person list in the model is updated using the IllnessContainsKeywordPredicate.
Step 9. Returns a CommandResult which then leads to the updated filtered person list to be displayed.
The following sequence diagram shows how the find patient by illness operation works:
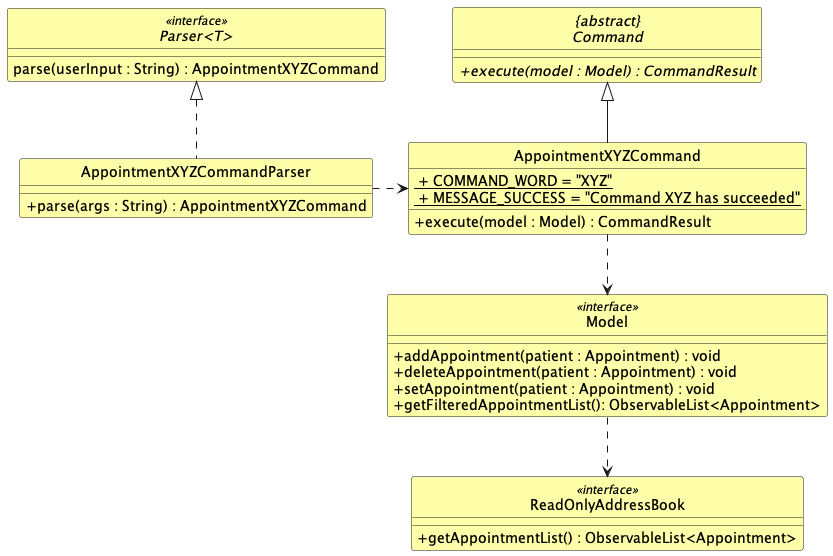
Implementation of appointments commands
The following diagram shows the overview of a generic appointment command AppointmentXYZCommand and the associated classes.
The generic appointment command can be Schedule, Reschedule, etc..
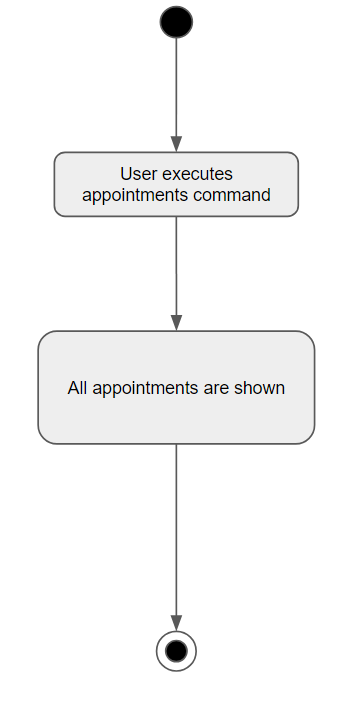
View all appointments feature
Implementation
For Appointments command, the noteworthy class is:
-
AppointmentsCommand.java- For execution of the view all appointments command.
– user input –
Step 1. User executes appointments command to view all appointments.
– AddressBookParser –
Step 2. Returns new AppointmentsCommand
– AppointmentsCommand –
Step 3. Shows all appointments.
The following activity diagram shows how the view appointments operation works:
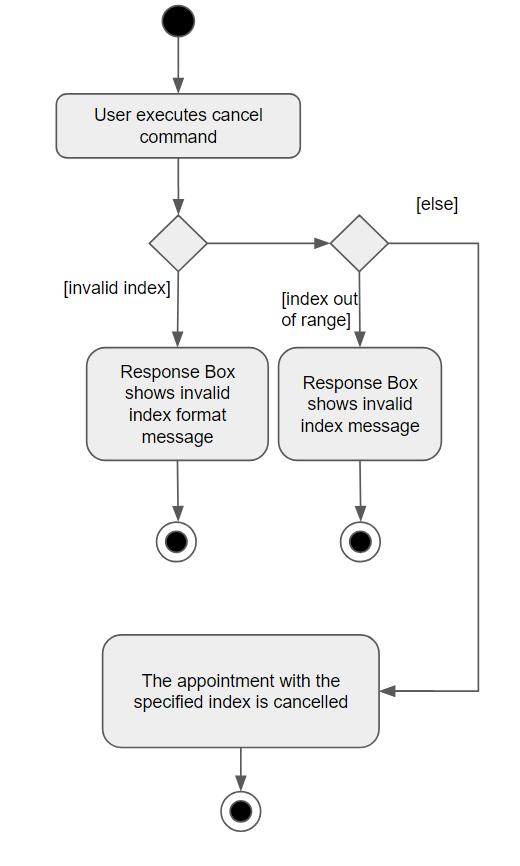
Cancel feature
Implementation
For Cancel command, the noteworthy classes are:
-
CancelCommandParser.java- For passing the arguments toCancelCommand. -
CancelCommand.java- For execution of the cancel appointment command.
The following exceptions may be thrown during this process, namely:
- ParseException for invalid index format
- CommandException for index out of range
– user input –
Step 1. User executes cancel command with a valid appointment index.
– AddressBookParser –
Step 2. Returns new CancelCommandParser.
– CancelCommandParser –
Step 3. Verify that the index is correct.
Step 4. Returns new CancelCommand.
– CancelCommand –
Step 5. Verify that the index is not out of range in the appointments list.
Step 6. Appointment is cancelled and deleted from the appointments list.
The following activity diagram shows how the cancel operation works:
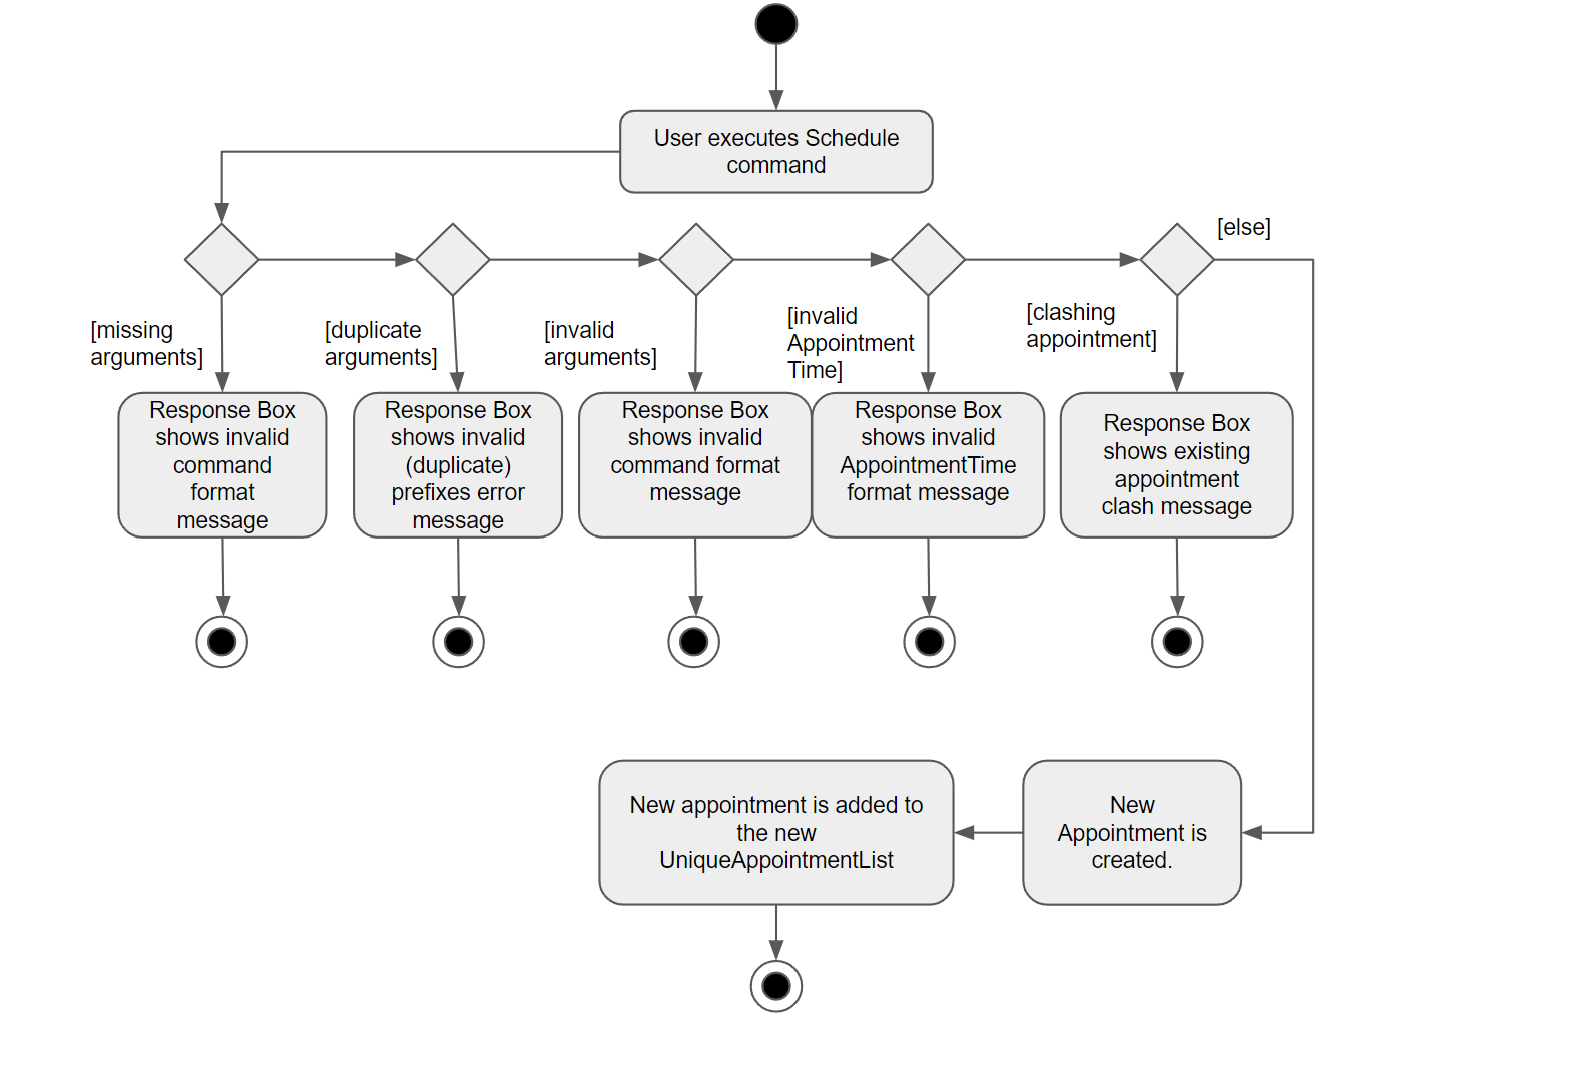
Schedule feature
Implementation
The implementation of the schedule feature is similar to the implementation for adding a patient. The Schedule command takes in an Appointment object (containing the Start Time, End Time and Appointment Description) and Name object (containing the name of the patient for whom the appointment is booked).
For Schedule command, the noteworthy classes are:
-
ScheduleCommandParser.java- For parsing the arguments toScheduleCommand. -
ScheduleCommand.java- For execution.
The following exceptions may be thrown during this process, namely:
- ParseException for missing arguments
- ParseException for invalid arguments
- ParseException for Appointment Start Time after Appointment End Time
- CommandException for creating appointments for patients not in MediFlowR’s records
- CommandException for identical appointments
- CommandException for appointments with clashing timeslots
– user input –
Step 1. User executes schedule command by starting command with the ‘schedule’ keyword, followed by
correct and valid arguments.
– AddressBookParser –
Step 2. Returns new ScheduleCommandParser.
– ScheduleCommandParser –
Step 3. Verify that all argument prefixes are present and that no duplicates exist.
Step 4. Verify that provided arguments are valid.
Step 5. Returns new ScheduleCommand.
– ScheduleCommand –
Step 6. Verify that the patient for whom the Appointment is created exists in MediFlowR’s records.
Step 7. Verify that the Appointment Start Time appears before the Appointment End Time.
Step 8. Verify that the same appointment has not already been added.
Step 9. Verify that the new appointment to be added does not have time conflict with another appointment on the
same day.
Step 10. Appointment is scheduled.
The following activity diagram shows how the schedule operation works:
Design considerations:
- We decided to make the Schedule Feature case-sensitive. The patient name provided by the user must match the patient name in MediFlowR’s
records (even case sensitivity). The rationale is as such:
- Currently, in our application, it is possible for 2 patients to be created with names ‘John Doe’ and ‘John doe’. A case-insensitive Schedule command for ‘John Doe’ will cause a conflict. Thus, we have mandated that for the Schedule Feature, the patient name have an exact match with the patient name in our database. This also reduces the chances of the user accidentally scheduling an appointment for the wrong patient but ensuring that the user conscientiously schedules an appointment for the specific patient.
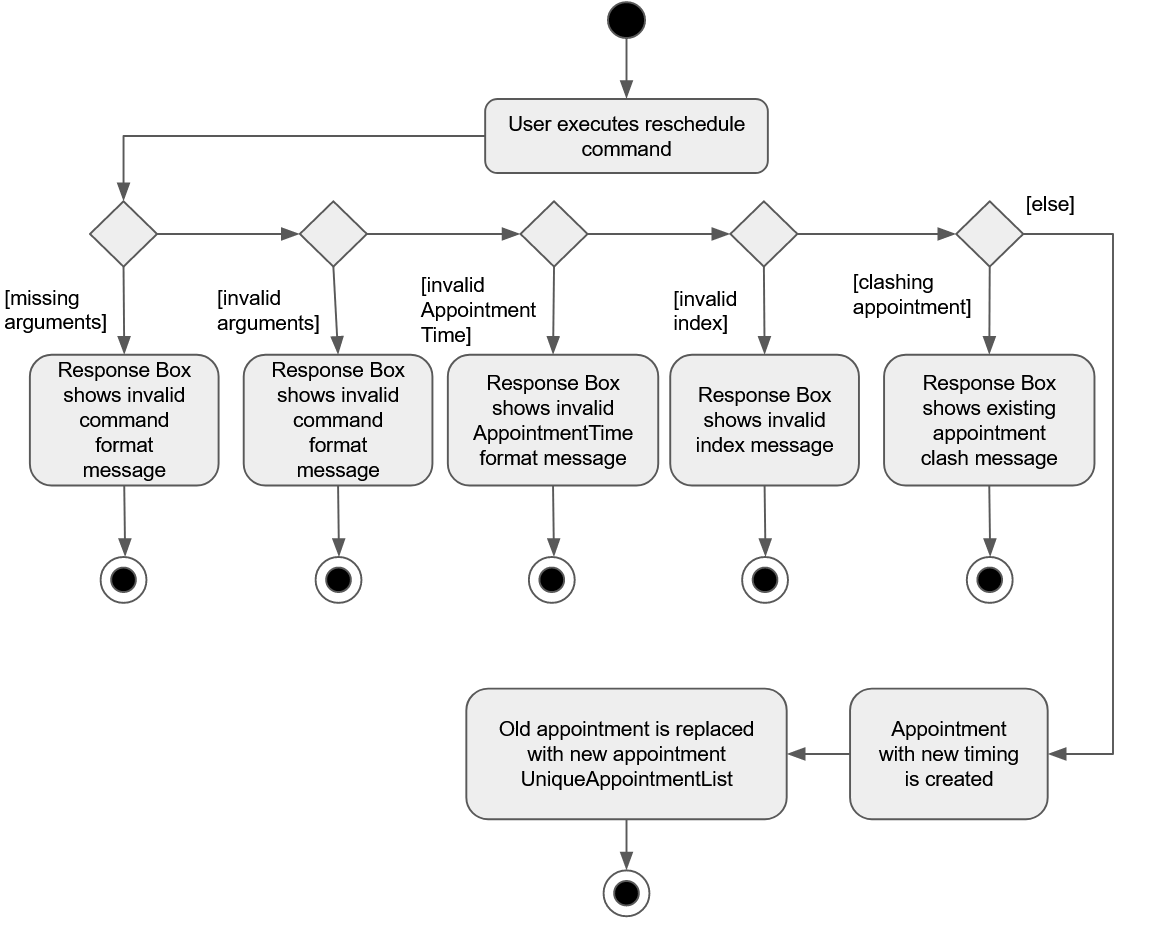
Reschedule feature
Implementation
For Reschedule command, the noteworthy classes are:
-
RescheduleCommandParser.java- For parsing the arguments toRescheduleCommand. -
RescheduleCommand.java- For execution.
The following exceptions may be thrown during this process, namely:
- ParseException for missing arguments
- ParseException for invalid arguments
- CommandException for index out of range
- CommandException for identical appointments
- CommandException for appointments with clashing timeslots
– user input –
Step 1. User executes reschedule command with correct and valid arguments.
– AddressBookParser –
Step 2. Returns new RescheduleCommandParser.
– RescheduleCommandParser –
Step 3. Verify that all argument prefixes are present.
Step 4. Verify that provided arguments are valid.
Step 5. Returns new RescheduleCommand.
– RescheduleCommand –
Step 6. Verify that the given index exist in UniqueAppointmentList.
Step 7. Verify that the new appointment to be added does not have time conflict with another appointment on the same day.
Step 8. Verify that the same appointment has not already been added.
Step 9. Appointment is rescheduled.
The following activity diagram shows how the reschedule operation works:
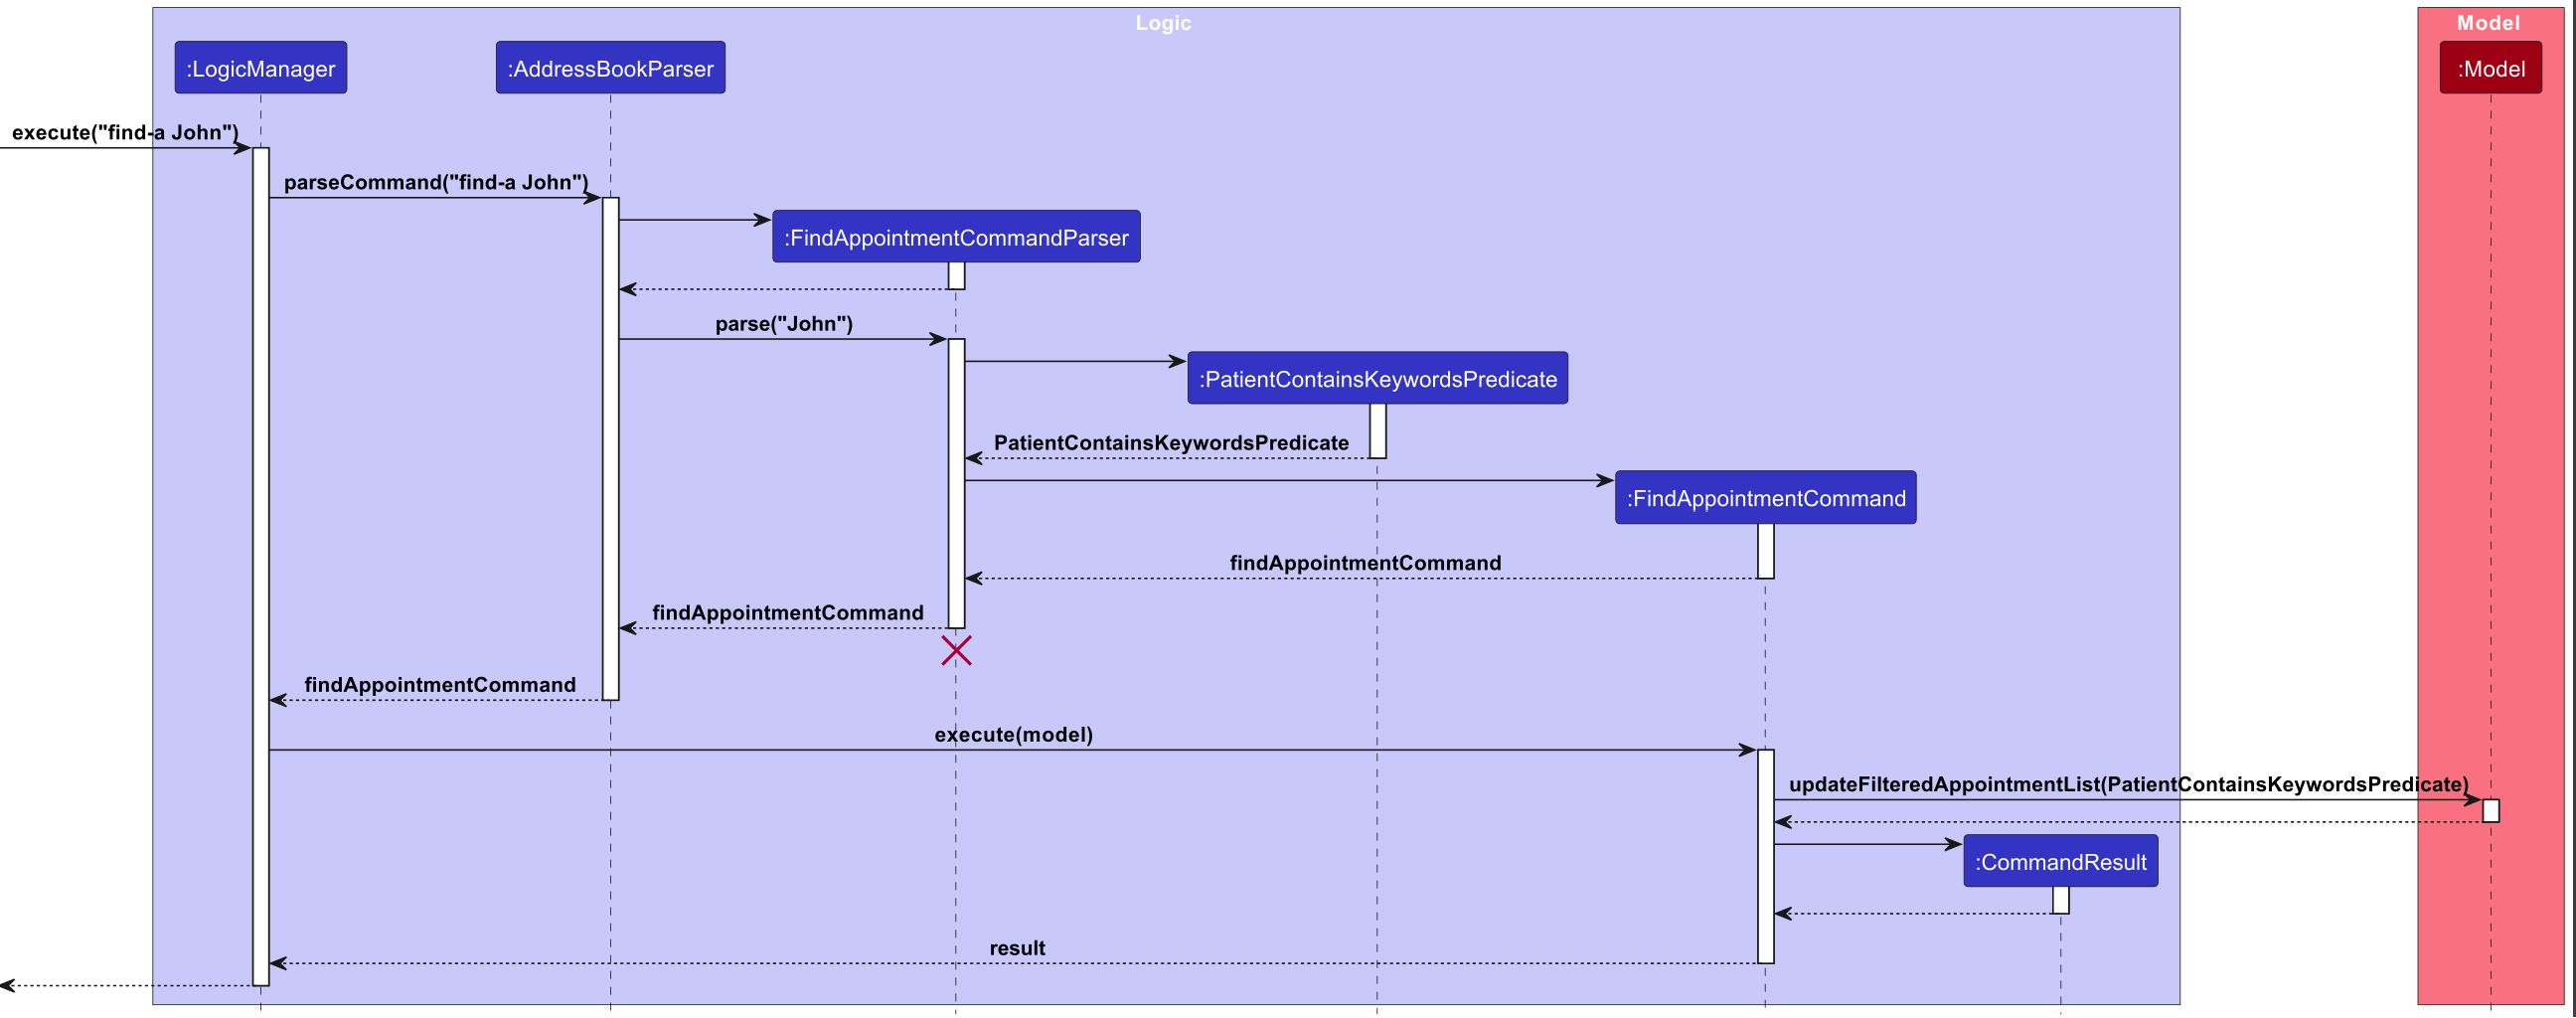
Find patient appointments feature
Implementation
For FindAppointment command, the noteworthy classes involved are:
-
LogicManager.java- Calls the address book parser. -
AddressBookParser.java- For passing the arguments toFindAppointmentCommandParser. -
FindAppointmentCommandParser.java- This parses the user input, checks for its validity and creates a newFindAppointmentCommandobject. -
FindAppointmentCommand.java- This command object executes to update the filtered appointments list to show all appointments that is tagged to a patient whose named is specified through the keyword.
Let’s take a valid user input, find-a John, as an example.
– user input: find-a John –
Step 1. Logic Manager parses the user input through the AddressBookParser.
– AddressBookParser –
Step 2. AddressBookParser identifies the command word find-a.
Step 3. Returns FindAppointmentCommandParser().parse(arguments) (in this case arguments = John)
– FindAppointmentCommandParser –
Step 4. FindAppointmentCommandParser takes in arguments (John) and uses the arguments to create the PatientContainsKeywordsPredicate object.
Step 5. Returns a FindAppointmentCommand object which takes in the PatientContainsKeywordsPredicate object as a parameter.
– FindAppointmentCommand –
Step 6. The PatientContainsKeywordsPredicate object is saved in the FindAppointmentCommand object.
– LogicManager –
Step 7. The FindAppointmentCommand object is returned and its execute(model) method is triggered.
Step 8. The filtered appointment list in the model is updated using the PatientContainsKeywordsPredicate.
Step 9. Returns a CommandResult which then leads to the updated filtered appointment list to be displayed.
Note: 1) Multiple keywords, denoted by a space, can be used. 2) Patient name must be an exact match to any one of the keywords keyed into the program (CASE-INSENSITIVE).
The following sequence diagram shows how the find appointment command works:
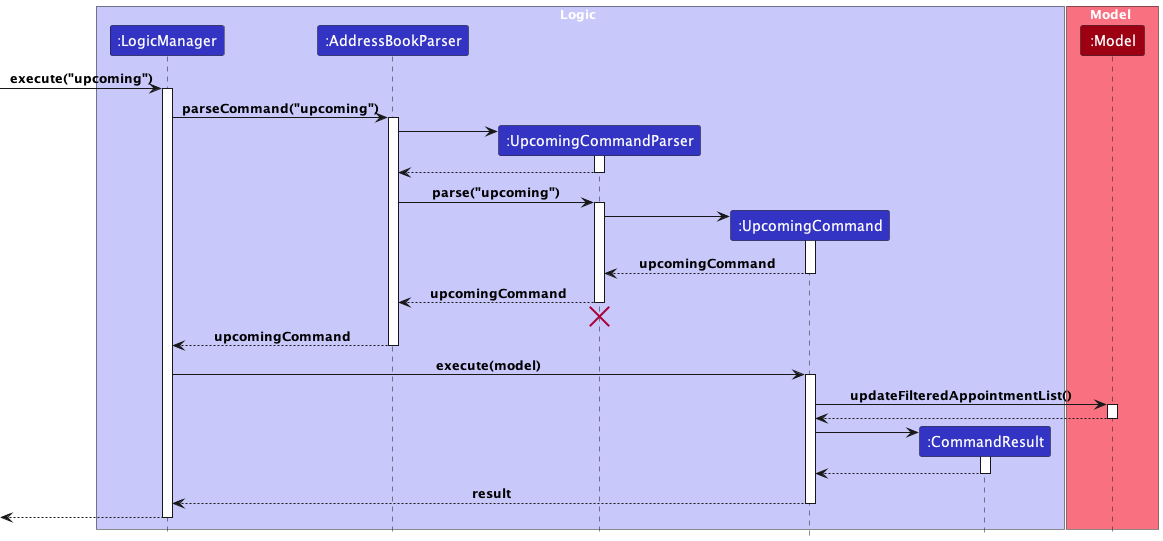
Display upcoming appointments feature
Implementation
For Upcoming command, the noteworthy classes involved are:
-
UpcomingCommandParser.java- This parses the user input and creates a newUpcomingCommandobject. -
UpcomingCommand.java- This command object executes to update the filtered appointments list to show all upcoming appointments (appointments after the current time) in the application.
The feature is implemented by updating the filtered appointment list stored in the model with a predicate that will only display appointments with start date times after the current date time.
The following sequence diagram shows how the upcoming command works:
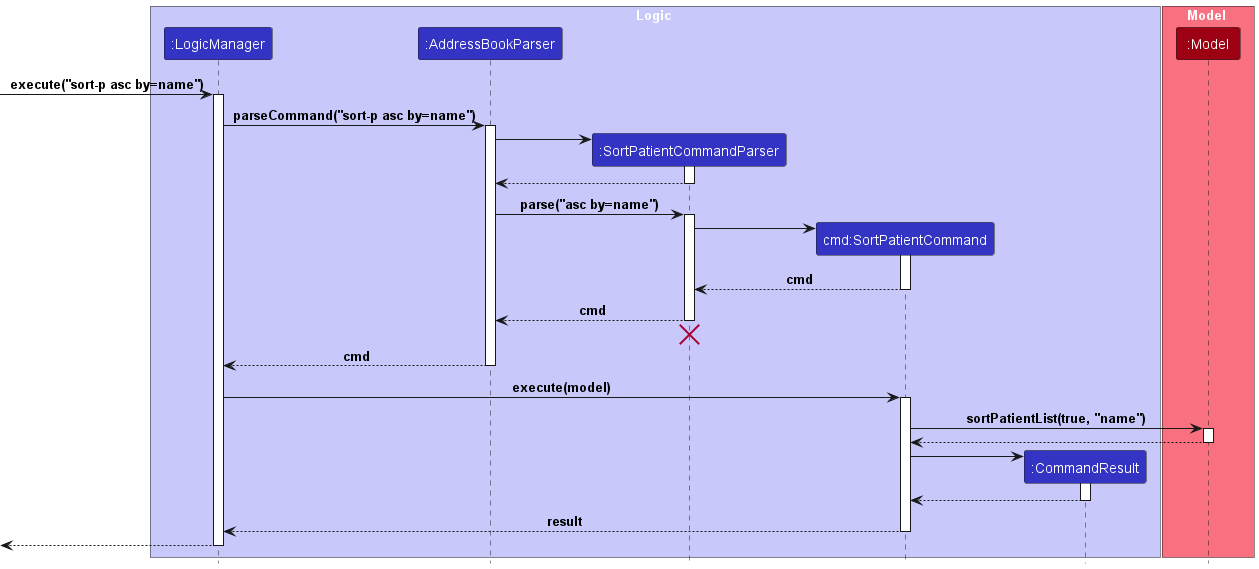
Sort patients/appointment features
Implementation
For sort-p and sort-a commands, the noteworthy classes involved are:
-
SortPatientCommandParser.java- This parses the user input and creates a newSortPatientCommandobject. -
SortPatientCommand.java- This command object executes to sort the patient list by ascending or descending order and by the given attribute to sort by. -
SortCommandParser.java- This parses the user input and creates a newSortCommandobject. -
SortCommand.java- This command object executes to sort the appointment list by ascending or descending order and by the given attribute to sort by.
The following exceptions may be thrown during this process, namely:
- ParseException for missing arguments
- ParseException for invalid arguments
The feature is implemented by sorting the unfiltered patient/appointment list stored in the model with using a custom comparator depending on each attribute.
Given below is an example usage scenario and how the sort-p/sort-a mechanism behaves at each step.
– user input –
Step 1. User executes sort-p/sort-a command with correct and valid arguments.
– AddressBookParser –
Step 2. Returns new SortPatientCommandParser/SortCommandParser.
– SortPatientCommandParser/SortCommandParser –
Step 3. Verify that all argument prefixes are present.
Step 4. Verify that provided arguments are valid.
Step 5. Returns new SortPatientCommand/SortCommand.
– SortPatientCommand/SortCommand –
Step 6. Patient/Appointment list is sorted.
The following sequence diagram shows how the sort patient command works:
Design considerations:
- We decided to implement the comparator for names to compare the names after the names have been converted to lower case. This is as we want it to be sorted in that order, where john doe is considered smaller than Kevin Porter Jr.
- We eventually want to sort from distance from the current location of the machine so we made the attributes easily expandable for future support.
Additional Info:
- The sort command under appointments is implemented similarly but sorts the appointment list either by priority or time.
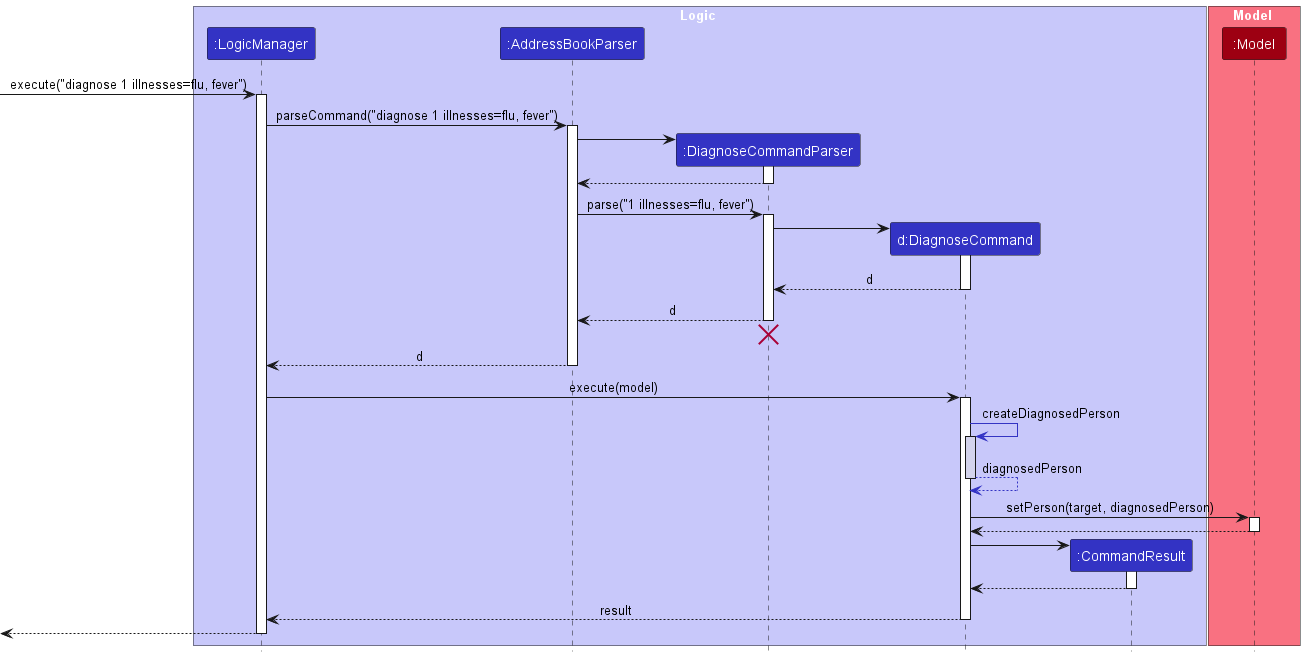
Diagnose/Undiagnose Feature
Implementation
For Diagnose/Undiagnose command, the noteworthy classes are:
-
DiagnoseCommandParser.java- For parsing the arguments toDiagnoseCommand. -
UndiagnoseCommandParser.java- For parsing the arguments toUndiagnoseCommand. -
DiagnoseCommand.java- For execution. -
UndiagnoseCommand.java- For execution.
The following exceptions may be thrown during this process, namely:
- ParseException for missing arguments
- ParseException for invalid arguments
- CommandException for invalid index
Given below is an example usage scenario and how the diagnose mechanism behaves at each step.
– user input –
Step 1. User executes diagnose command with correct and valid arguments.
– AddressBookParser –
Step 2. Returns new DiagnoseCommandParser.
– DiagnoseCommandParser –
Step 3. Verify that all argument prefixes are present.
Step 4. Verify that provided arguments are valid.
Step 5. Calls ParserUtil#parseIllnesses() to create the set of illnesses.
Step 6. Returns new DiagnoseCommand.
– DiagnoseCommand –
Step 7. Calls DiagnoseCommand#createDiagnosedPerson() to add the set of illnesses to the patients existing set of illnesses.
Step 8. Check which illnesses were already inside to feedback to user.
Step 9. Patient is diagnosed.
Given below is an example usage scenario and how the undiagnose mechanism behaves at each step.
– user input –
Step 1. User executes undiagnose command with correct and valid arguments.
– AddressBookParser –
Step 2. Returns new UndiagnoseCommandParser.
– UndiagnoseCommandParser –
Step 3. Verify that all argument prefixes are present.
Step 4. Verify that provided arguments are valid.
Step 5. Calls ParserUtil#parseIllnesses() to create the set of illnesses.
Step 6. Returns new UndiagnoseCommand.
– UndiagnoseCommand –
Step 7. Calls UndiagnoseCommand#createUndiagnosedPerson() to remove the set of illnesses to the patients existing set of illnesses.
Step 8. Check which illnesses were never inside to feedback to user.
Step 9. Patient is undiagnosed.
The following sequence diagram shows how the diagnose patient command works:
Undo/Redo Feature
Implementation
For Undo/Redo command, the noteworthy classes are:
-
UndoCommandParser.java- For parsing the arguments toUndoCommand. -
RedoCommandParser.java- For parsing the arguments toRedoCommand. -
UndoCommand.java- For execution. -
RedoCommand.java- For execution.
The following sequence diagram shows how the undo command works:
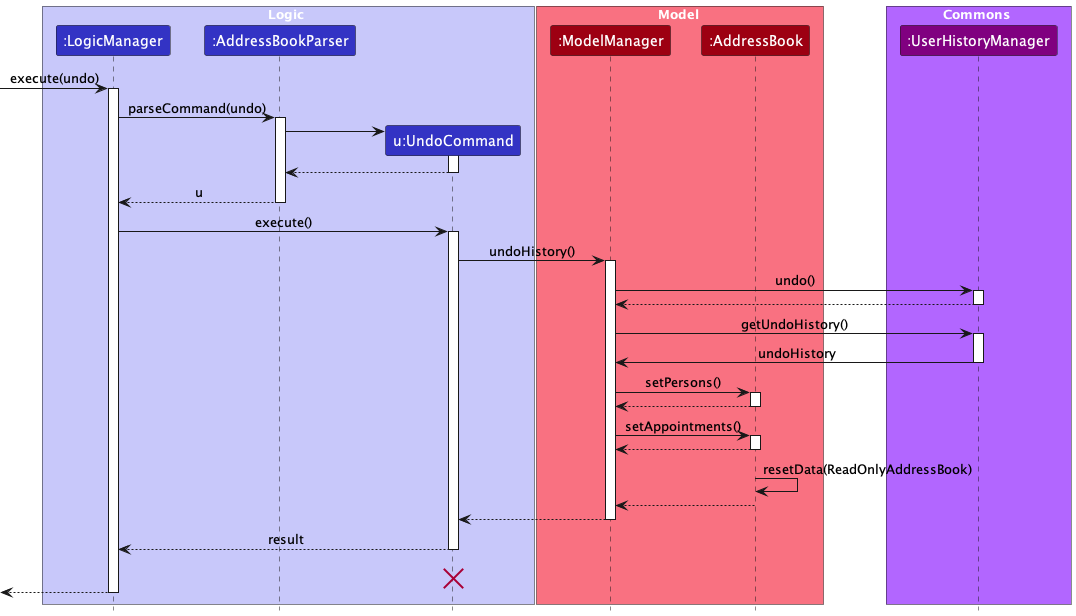
The following exceptions may be thrown during this process, namely:
- ParseException for additional arguments with undo/redo command
- CommandException for attempting to execute undo when there is no command to undo
- CommandException for attempting to execute redo when there is no undone command to redo
Given below is an example usage scenario of how the Undo command executes.
– user input –
Step 1. User executes a valid add command.
– AddCommand –
Step 2. Adds the add command as recent command.
Step 3. Adds the added person as new patient.
– user input –
Step 4. User executes undo command.
– UndoCommand –
Step 5. Verify that there is a command to undo.
Step 6. Undo the most recent command (deletes the new patient).
– RedoCommand –
Step 7. Verify that there is an undone command to undo.
Step 8. Redo the most recent undone command (restores the deleted patient).
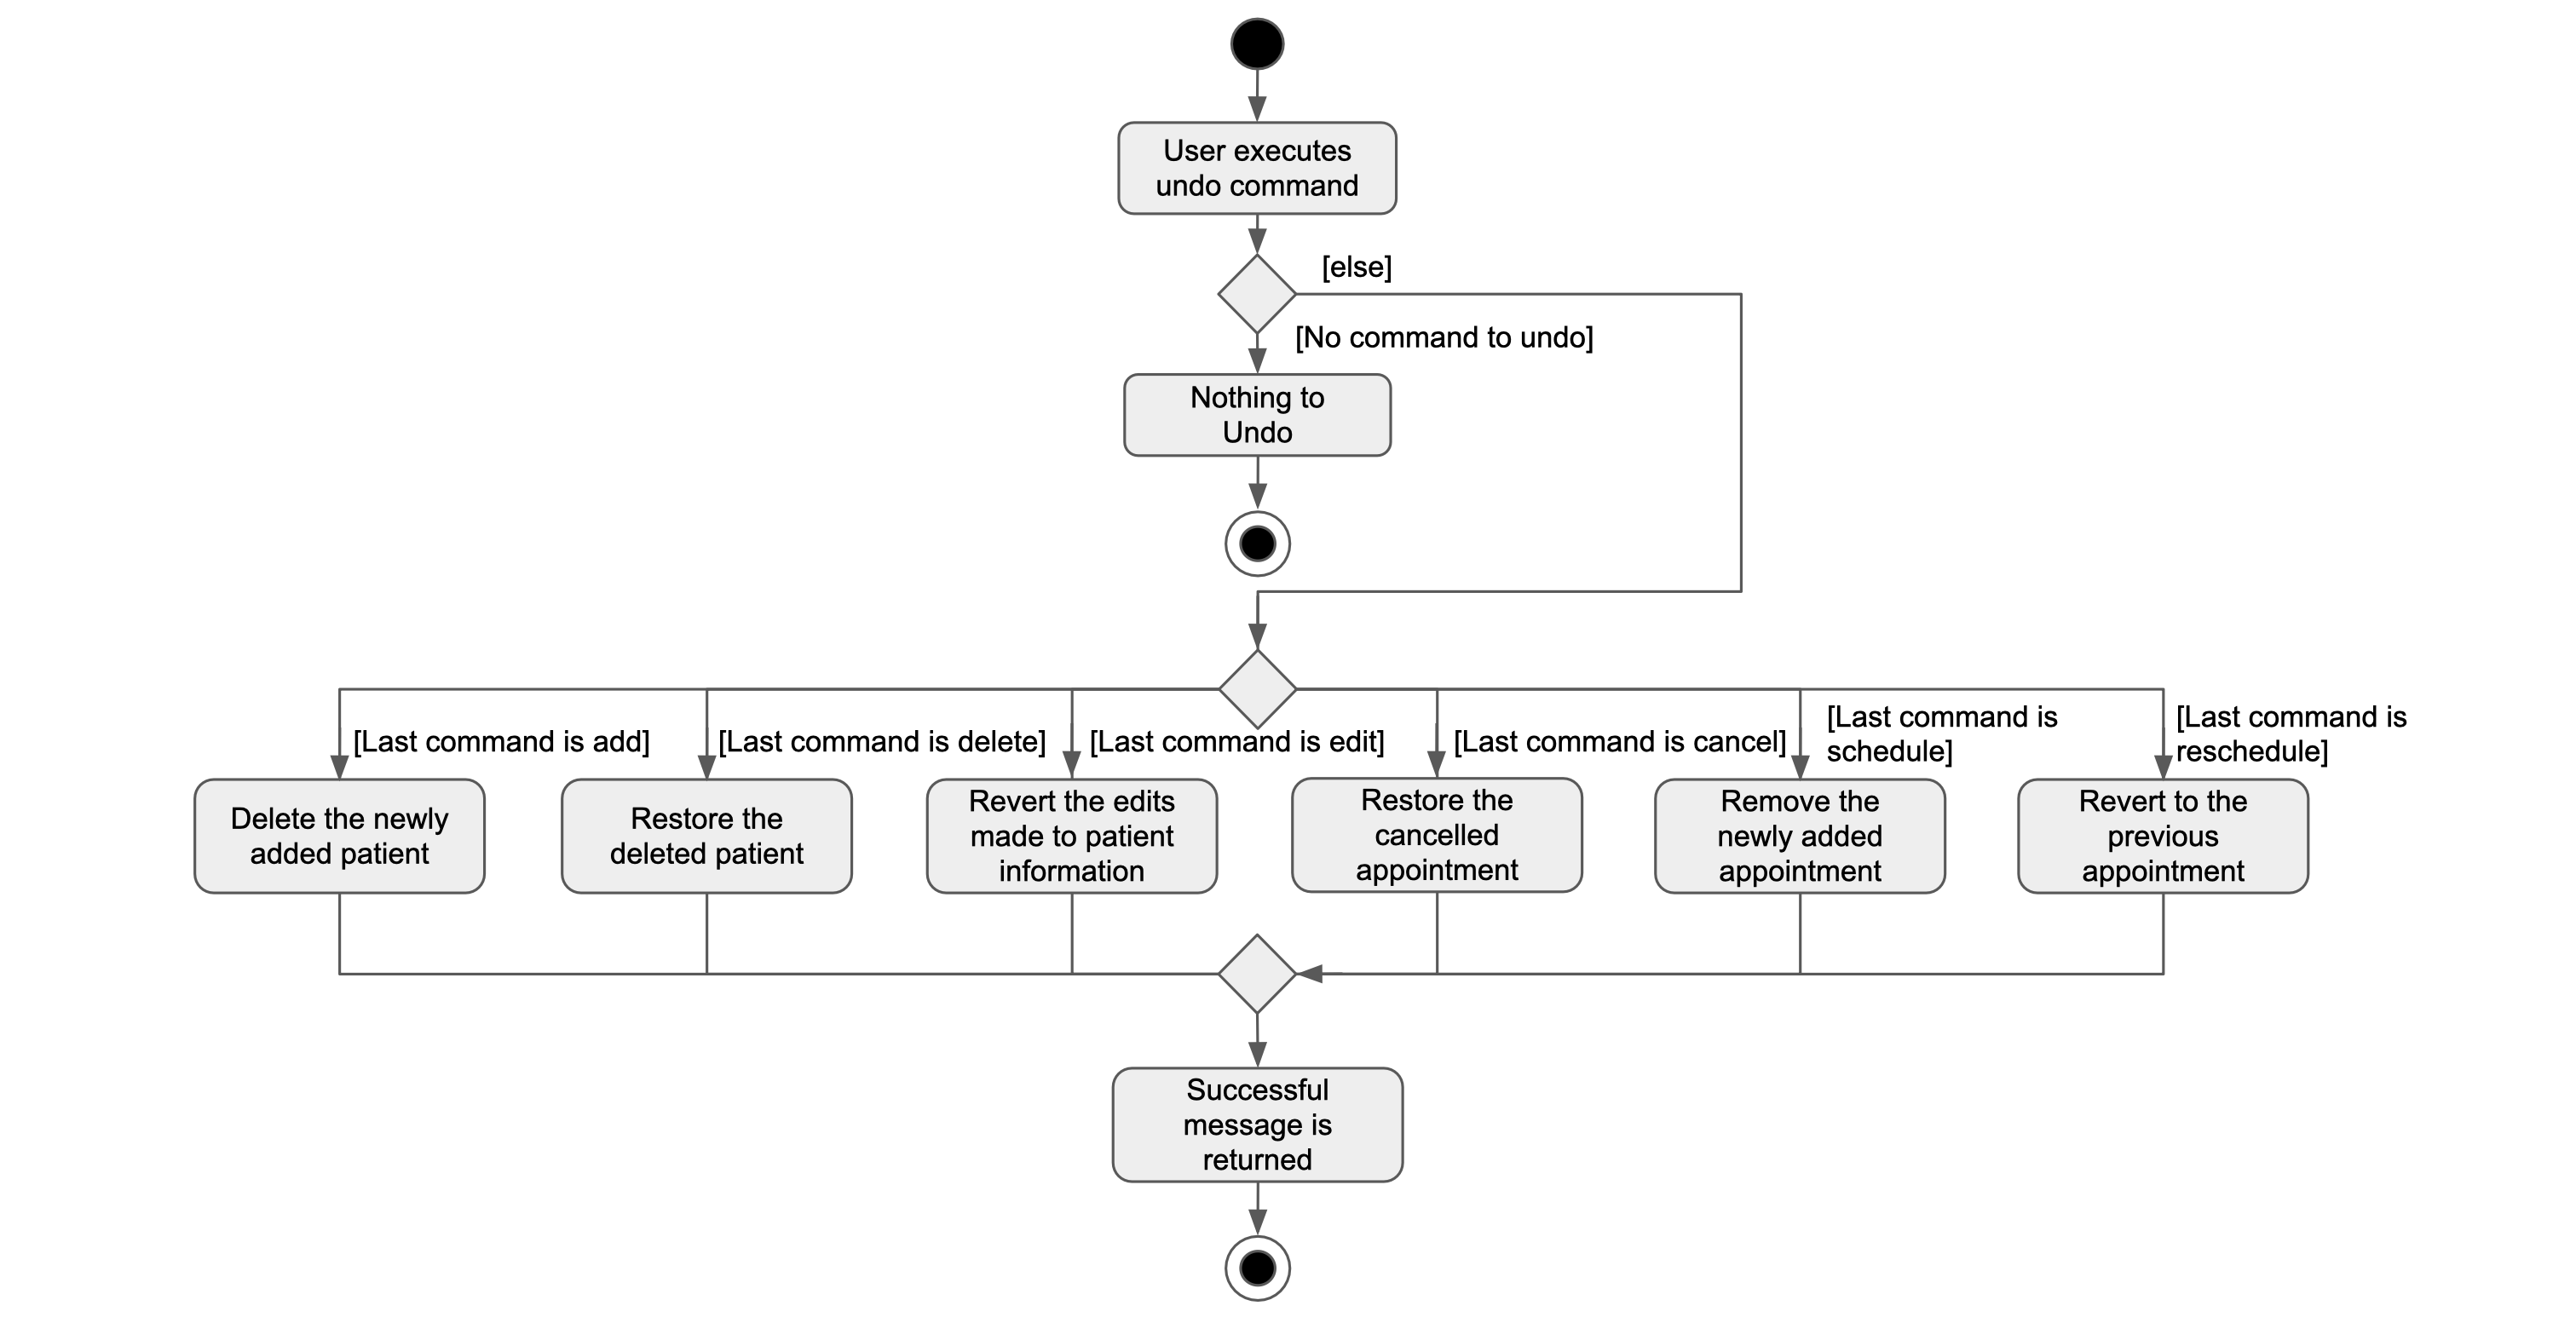
The execution can be seen in the activity diagram given below.
Activity Diagram for a typical undo command
Design considerations:
- undoHistory and redoHistory are implemented with stacks as the behavior of always operating on the most recent action is consistent with the Last-In-First-Out (LIFO) nature of a stack.
- Although storing the state of the program after every user action is not memory efficient, our test runs revealed that the memory usage was insignificant and thus this design can be safely implemented.
- The undo/redo commands does not support the following commands:
appointments,find,today,upcoming,find-i,find-p,patients,exit,helpandlist. The rationale is as such:- The
find,todayandupcomingcommands can be undone by theappointmentsandlistcommand and vice versa. - The
find-iandfind-pcommands can be undone by thepatientsandlistvice versa. - The
exitandhelpcommands do not operate on the data, hence there is no need for them to be undone
- The
Documentation, logging, testing, configuration, dev-ops
Appendix: Requirements
Product scope
Target user profile: Healthcare Professionals who
- have a need to manage a significant number of patients at any given time
- can add, update, delete and search patient records
- are required to update, access and track multiple patients’ treatment history
- manage the scheduling, rescheduling and cancelling of appointments
- prefer desktop apps over other types
- can type fast
- prefer typing to mouse interactions
- are reasonably comfortable using CLI apps
Value proposition: manage patients’ medical records faster than a typical GUI driven app in a systematic manner
User stories
Priorities: High (must have) - * * *, Medium (nice to have) - * *, Low (unlikely to have) - *
| Priority | As a … | I want to … | So that I can… |
|---|---|---|---|
* * * |
healthcare professional | create new patient records with relevant demographic information | add new patient records into the system |
* * * |
healthcare professional | update patient records as needed | keep the patient’s information accurate and up to date |
* * * |
healthcare professional | delete patient records as needed | remove unused/outdated patient records |
* * * |
healthcare professional | search and retrieve patient records using their name quickly | find the necessary information efficiently without going through the entire list |
* * * |
healthcare professional | list all patients currently recorded in the system | see the general workload of the service. |
* * * |
healthcare professional | sort patients by their name or birthdate | quickly organise the patients in the order I want |
* * * |
healthcare professional | schedule appointments for patients | set the date and time of patients’ next appointment |
* * * |
healthcare professional | reschedule appointments when necessary | make sure my schedule does not clash with the appointments |
* * * |
healthcare professional | cancel appointments when necessary | clear up my schedule if a patient is not able to make it |
* * * |
healthcare professional | sort appointments by date or patient name | quickly organise the appointments in a chronological order |
* * |
healthcare professional | add custom remarks to a patient’s appointment | give them detailed instructions and feedback after consultation |
* * |
healthcare professional | view a calendar with all scheduled appointments | plan my day effectively |
* |
healthcare professional | schedule appointments for patients and assign them to specific doctors with matching schedules | efficiently match patients with free doctors |
* |
healthcare professional | set reminders to patients for follow-up appointments | ensure that patients know about the follow-up appointments |
Use cases
(For all use cases below, the System is the MediFlowR (MFR) and the Actor is the user, unless specified otherwise)
Use case 1 (UC1): Add a patient
MSS
- User requests to add a patient with name
-
MFR adds the patient and displays a confirmation message
Use case ends.
Extensions
-
1a. Another patient with the same name already exists in the list.
-
1a1. MFR shows duplicate patient error message.
Use case resumes at step 1.
-
-
1b. The user inputs are invalid/incomplete.
-
1b1. MFR shows an error message.
Use case resumes at step 1.
-
Use case 2 (UC2): Edit a patient
MSS
- User requests to edit a patient’s information at an index
-
MFR edits the patient’s information and displays a confirmation message
Use case ends.
Extensions
-
1a. The given index is invalid
-
1a1. MFR shows invalid index error message.
Use case resumes at step 1.
-
-
1b. Another patient with the same name already exists in the list.
-
1b1. MFR shows duplicate patient error message.
Use case resumes at step 1.
-
-
1c. The user inputs are invalid/incomplete.
-
1c1. MFR shows an error message.
Use case resumes at step 1.
-
Use case 3 (UC3): Delete a patient
MSS
- User requests to delete a patient at an index
-
MFR deletes the patient and displays a confirmation message
Use case ends.
Extensions
-
1a. The given index is invalid
-
1a1. MFR shows invalid index error message.
Use case resumes at step 1.
-
Use case 4 (UC4): List all patients
MSS
- User asks for a list of all patients
-
MFR displays a list of all patients
Use case ends.
Use case 5 (UC5): Search for a patient
MSS
- User searches for a name of a patient
-
MFR displays a list of patients which contain that name
Use case ends.
Use case 6 (UC6): Search for a patient with a certain illness
MSS
- User searches for an illness name
-
MFR displays a list of patients which have an illness with that name
Use case ends.
Use case 7 (UC7): Add illness to a patient
MSS
- User uses the command to add one or more new illnesses to a patient at an index
-
MFR displays a confirmation message
Use case ends.
Extensions
-
1a. The given index is invalid
-
1a1. MFR shows invalid index error message.
Use case resumes at step 1.
-
-
1b. The given illness is not valid
-
1b1. MFR shows invalid illness error message.
Use case resumes at step 1.
-
Use case 8 (UC8): Remove illness from a patient
MSS
- User uses the command to remove one or more new illnesses from a patient at an index
-
MFR displays a confirmation message
Use case ends.
Extensions
-
1a. The given index is invalid
-
1a1. MFR shows invalid index error message.
Use case resumes at step 1.
-
-
1b. The given illness is not valid
-
1b1. MFR shows invalid illness error message.
Use case resumes at step 1.
-
Use case 9 (UC9): Sort patients
MSS
- User wants the current list of patients to be sorted by an attribute
-
MFR displays a list of patients sorted by the given attribute
Use case ends.
Extensions
-
1a. The user inputs are invalid/incomplete.
-
1a1. MFR shows an error message.
Use case resumes at step 1.
-
Use case 10 (UC10): Schedule an appointment
MSS
- User requests to schedule an appointment for a patient
-
MFR adds the appointment and displays a confirmation message
Use case ends.
Extensions
-
1a. The patient does not exist in the list
-
1a1. MFR shows patient does not exist error message.
Use case resumes at step 1.
-
-
1b. Another appointment with the same start and end already exists in the list
-
1b1. MFR shows duplicate timeslot error message.
Use case resumes at step 1.
-
-
1c. The user inputs are invalid/incomplete.
-
1c1. MFR shows an error message.
Use case resumes at step 1.
-
Use case 11 (UC11): Reschedule an appointment
MSS
- User requests to reschedule an appointment’s start and end at an index
-
MFR edits the appointment’s start and end and displays a confirmation message
Use case ends.
Extensions
-
1a. The given index is invalid
-
1a1. MFR shows invalid index error message.
Use case resumes at step 1.
-
-
1b. Another appointment with the same start and end already exists in the list
-
1b1. MFR shows duplicate timeslot error message.
Use case resumes at step 1.
-
-
1c. The user inputs are invalid/incomplete.
-
1c1. MFR shows an error message.
Use case resumes at step 1.
-
Use case 12 (UC12): Cancel an appointment
MSS
- User requests to cancel an appointment at an index
-
MFR deletes the appointment and displays a confirmation message
Use case ends.
Extensions
-
1a. The given index is invalid
-
1a1. MFR shows invalid index error message.
Use case resumes at step 1.
-
Use case 13 (UC13): List all appointments
MSS
- User asks for a list of all appointments
-
MFR displays a list of all appointments
Use case ends.
Use case 14 (UC14): Sort appointments
MSS
- User wants the current list of appointments to be sorted by an attribute
-
MFR displays a list of appointments sorted by the given attribute
Use case ends.
Extensions
-
1a. The user inputs are invalid/incomplete.
-
1a1. MFR shows an error message.
Use case resumes at step 1.
-
Use case 15 (UC15): Search for appointment for a patient
MSS
- User searches for a name of a patient
-
MFR displays a list of appointments scheduled for patients which contain that name
Use case ends.
Use case 16 (UC16): Undo a command
MSS
- User requests to undo previous command
-
MFR displays a confirmation message
Use case ends.
Extensions
-
1a. User has not executed any commands that are undo-able.
-
1a1. MFR shows an error message.
Use case resumes at step 1.
-
Use case 17 (UC17): Redo a command
MSS
- User requests to redo a command that was undone
-
MFR displays a confirmation message
Use case ends.
Extensions
-
1a. User has not undone any command.
-
1a1. MFR shows an error message.
Use case resumes at step 1.
-
Use case 18 (UC18): Toggle dark/light mode
MSS
- User requests to toggle dark/light mode
-
MFR changes the display to dark/light mode
Use case ends.
Use case 19 (UC19): Clear Database
MSS
- User requests clear all patients
-
MFR clears the list and displays a confirmation message
Use case ends.
Use case 20 (UC20): Ask For Help
MSS
- User asks for help
-
MFR displays a link to the help page
Use case ends.
Non-Functional Requirements
- Should work on any mainstream OS as long as it has Java
11or above installed. - Should be able to hold up to 1000 patients without a noticeable sluggishness in performance for typical usage.
- A user with above average typing speed for regular English text (i.e. not code, not system admin commands) should be able to accomplish most of the tasks faster using commands than using the mouse.
- The application should be able to be resized horizontally and vertically.
- The app should be able to handle unexpected input and edge cases, without making the app to crash or any data loss.
- The user interface should be friendly enough for users who are not tech-savvy.
- The application does not require for internet connection to work properly.
- The size of the application in the hard disk should be no larger than 100MB, exclusive of the data.
Glossary
-
Mainstream OS:
- Refers to the most commonly used operating systems in the market, including Windows, Linux, Unix, and OS-X (MacOS).
-
Command Line Interface (CLI):
- A text-based interface way of interacting with a software by inputting commands.
-
User Interface (UI):
- Refers to the application that the user interacts with.
-
Command:
- Refers to the input given by the user to perform certain operations or functions in the application.
Appendix: Instructions for manual testing
Given below are a series of instructions that can be followed to perform manual testing of the application.
Launch and shutdown
-
Initial launch
- Download the jar file and copy into an empty folder
-
Double-click the jar file
Expected: Shows the GUI with a set of sample contacts and appointments.
-
Normal launch
-
Launch the application again
Expected: Shows the GUI with a set of sample contacts and appointments.
-
-
Restarting the application with existing data
- Click on the ‘X’ button located in the top-right corner of the screen
-
Double-click the jar file
Expected: Shows the GUI with the existing data unchanged.
Adding a patient
-
Adding a patient that has not yet been added to the patient list
-
Execute the command:
add name=John Doe gender=MALE birthdate=2000/10/20 phone=98765432 email=johnd@example.com address=311, Clementi Ave 2, #02-25 illnesses=feverExpected: The patient has been successfully added to the patient list
-
-
Adding a patient that already exists in patient list
-
Execute the command:
add name=John Doe gender=MALE birthdate=2000/10/20 phone=98765432 email=johnd@example.com address=311, Clementi Ave 2, #02-25 illnesses=feverExpected: The Status Box displays the message “This patient already exists in the records”
-
Deleting a patient
-
Deleting a patient from a patient list with 3 patients
- Prerequisites: List all patients using the
listcommand. 3 patients in the list. -
Execute the command:
delete 1Expected: First contact is deleted from the list. Details of the deleted contact shown in the status box.
-
Execute the command:
delete 0Expected: No person is deleted. Error details shown in the status box. Patient list remains the same.
-
Execute the command:
delete 10Expected: No person is deleted. Error details shown in the status box. Patient list remains the same.
- Prerequisites: List all patients using the
Updating a patient’s details
-
Updating a patient’s details with valid data
- Prerequisites: Ensure that at least one patient is displayed in the list.
-
Execute the command:
edit 1 birthdate=2001/12/14 phone=93842738Expected: The patient at index 1 is updated with the new birthdate and phone number. The updated details are reflected in the patient list.
-
Updating a patient’s details with invalid data
- Prerequisites: Ensure that at least one patient is displayed in the list.
-
Execute the command:
edit 1 birthdate=14/12/2001 phone=93842738Expected: No details are updated. Error details are shown in the status box indicating the date format is incorrect.
Diagnosing a patient
-
Diagnosing a patient with valid illness data
- Prerequisites: Ensure that at least one patient is displayed in the list.
-
Execute the command:
diagnose 1 illnesses=feverExpected: The patient at index 1 has ‘fever’ added to their list of illnesses. The updated illness list is reflected in the patient details.
-
Diagnosing a patient with multiple illnesses
- Prerequisites: Ensure that at least one patient is displayed in the list.
-
Execute the command:
diagnose 1 illnesses=fever,fluExpected: The patient at index 1 has both ‘fever’ and ‘flu’ added to their list of illnesses.
Undiagnosing a patient
-
Removing an illness from a patient
- Prerequisites: Ensure that at least one patient with the illness ‘fever’ is displayed in the list.
-
Execute the command:
undiagnose 1 illnesses=feverExpected: The illness ‘fever’ is removed from the patient at index 1. The updated illness list is reflected in the patient details.
Finding patients
-
Finding patients by name
-
Execute the command:
find-p alex davidExpected: All patients with names containing ‘alex’ or ‘david’ are displayed in the list.
-
-
Finding patients by illness
-
Execute the command:
find-i fever fluExpected: All patients with illnesses containing ‘fever’ or ‘flu’ are displayed in the list.
-
Sorting patients
-
Sorting patients by name
-
Execute the command:
sort-p asc by=nameExpected: The patients are sorted by name in ascending order.
-
-
Sorting patients by birthdate
-
Execute the command:
sort-p desc by=birthdayExpected: The patients are sorted by birthday in descending order.
-
Viewing all patients
-
Displaying all patients
-
Execute the command:
patientsExpected: A list of all patients currently recorded in the application is displayed.
-
Scheduling a new appointment
-
Scheduling an appointment for an existing patient
- Prerequisites: Ensure that a patient with name “Alex Yeoh” is displayed in the list.
-
Execute the command:
schedule patient=Alex Yeoh start=2023/10/20 12:00 end=2023/10/20 13:00 description=Follow up on Chest X-Ray priority=highExpected: A new high priority appointment for Alex Yeoh on 20 October 2023 from 12pm to 1pm is scheduled and displayed in the appointments list.
-
Scheduling an appointment with overlapping times
- Prerequisites: Ensure an appointment exists for a patient at a given time.
-
Execute the command:
schedule patient=Alex Yeoh start=2023/10/20 12:00 end=2023/10/20 13:00 description=Follow up on Chest X-Ray priority=highExpected: No new appointment is scheduled. Error details are shown in the status box indicating the time conflict.
Rescheduling an appointment
-
Rescheduling an existing appointment
- Prerequisites: Ensure at least one appointment is displayed in the appointments list.
-
Execute the command:
reschedule 1 start=2023/05/02 09:00 end=2023/05/02 11:00Expected: The appointment with index 1 is rescheduled to 2 May 2023, from 9am to 11am, and the change is reflected in the appointments list.
-
Rescheduling an appointment to an invalid time
- Prerequisites: Ensure at least one appointment is displayed in the appointments list.
-
Execute the command:
reschedule 1 start=2023/10/20 13:00 end=2023/10/20 12:00Expected: The appointment is not rescheduled. Error details are shown in the status box indicating that the start time is after the end time.
Triaging an appointment
-
Changing the priority of an existing appointment
- Prerequisites: Ensure at least one appointment is displayed in the appointments list.
-
Execute the command:
triage 1 priority=highExpected: The priority of the appointment with index 1 is changed to high, and the update is reflected in the appointments list.
-
Changing the priority of a non-existent appointment
- Prerequisites: Ensure the appointments list is empty or the index provided does not exist.
-
Execute the command:
triage 2 priority=highwhere index 2 does not existExpected: Priority is not changed. Error details are shown in the status box indicating an invalid index.
Cancelling an appointment
-
Cancelling an existing appointment
- Prerequisites: Ensure at least one appointment is displayed in the appointments list.
-
Execute the command:
cancel 1Expected: The appointment with index 1 is cancelled and removed from the appointments list.
-
Cancelling an appointment with an invalid index
- Prerequisites: Ensure the appointments list is empty or the index provided does not exist.
-
Execute the command:
cancel 3where index 3 does not existExpected: No appointment is cancelled. Error details are shown in the status box indicating an invalid index.
Displaying all appointments
-
Displaying the full list of appointments
-
Execute the command:
appointmentsExpected: All scheduled appointments are displayed in the appointments list.
-
Finding appointments by patient name
-
Finding appointments by patient name
-
Execute the command:
find-a alex davidExpected: All appointments with patient names containing ‘alex’ or ‘david’ are displayed in the appointments list.
-
Displaying today’s appointments
-
Displaying appointments for today
-
Execute the command:
todayExpected: All appointments scheduled to start on the current date are displayed in the appointments list.
-
Displaying upcoming appointments
-
Displaying upcoming appointments
-
Execute the command:
upcomingExpected: All upcoming appointments are displayed in the appointments list.
-
Sorting appointments
-
Sorting appointments by date or priority
-
Execute the command:
sort-a asc by=timeExpected: The appointments are sorted by their start times in ascending order and displayed in the appointments list.
-
Undoing a command
-
Undoing a command that changes data
- Prerequisites: Perform a command that changes data, such as
add,delete,schedule,reschedule,triage, orcancel. -
Execute the command:
undoExpected: The most recent data-changing command is undone. The application’s state reverts to before the command was executed.
- Prerequisites: Perform a command that changes data, such as
-
Undoing a command that does not change data
- Prerequisites: Perform a command that does not change data, such as
find,today,upcoming,find-i,find-p,patients,exit,help, orlist. -
Execute the command:
undoExpected: No changes occur. An appropriate message indicating that the command cannot be undone is displayed.
- Prerequisites: Perform a command that does not change data, such as
Redoing a command
-
Redoing a previously undone command
- Prerequisites: Perform an
undooperation. -
Execute the command:
redoExpected: The previously undone command is redone. The application’s state updates to reflect the redone command.
- Prerequisites: Perform an
-
Redoing a command without an
undo- Prerequisites: Without having used
undo, attempt toredo. -
Execute the command:
redoExpected: No changes occur. An appropriate message indicating that there is no command to redo is displayed.
- Prerequisites: Without having used
Listing all records
-
Displaying all patient records and appointments
-
Execute the command:
listExpected: All patient records and all appointments are displayed.
-
Clearing all records
-
Clearing all patient records and appointments
-
Execute the command:
clearExpected: All patient records and appointments are cleared from the application.
-
Toggling dark/light mode
-
Toggling between dark and light modes
-
Execute the command:
modeExpected: The application’s theme toggles between dark and light mode.
-
Exiting the program
-
Exiting the program
-
Execute the command:
exitExpected: The application closes.
-
Viewing help
-
Viewing help information
-
Execute the command:
helpExpected: Help information is displayed, explaining how to access the help page.
-
Appendix: Planned Enhancements
-
The current success message after executing an undo or redo command is
Undo Successful.orRedo Successful., but this is too general and does not provide any useful information. We plan to add the exact command that was undone or redone to the success message so that the user knows exactly what command was undone or redone. -
Currently, after scheduling an appointment for a patient, the user is not able to change the description of the appointment. We plan to change the triage command so that it will allow the user to change the appointment description.
-
Currently, patients with the same name but with different casing, i.e. same letters but different in uppercase/lowercase, can be added to the patient records. However, that can be very confusing for users, especially if they had accidentally added a duplicate patient into the records but with a different casing for the patient name. We plan to make the checking for any duplicates in patient names case-insensitive so that this will no longer be an issue.
-
Currently, illnesses with the same name but with different casing, i.e. same letters but different in uppercase/lowercase, can be added to the same patient. However, that can be very confusing for users, especially if they had accidentally added a duplicate illness to the same patient but with a different casing for the illness name. We plan to make the checking for any duplicates in illness names case-insensitive so that this will no longer be an issue.
-
Currently, gender can only be
MALEorFEMALE, and the input has to match the words exactly, meaning that the input has to be uppercase. However, in order to optimise for fast typists, we plan to treat the gender attribute as case-insensitive, so that any input that is eithermaleorfemalewill be accepted without worrying about the casing. -
Currently, a patient’s birthdate can be set after the current date that the command is executed on. For example,
2023/10/20can be added as a patient’s birthdate even though the current date might be2023/08/08. We plan to add a validation for birthdates such that birthdates after the current date will not be considered a valid birthdate. -
Currently, the find command only is able to find by name. We plan to add the functionality to find anything that matches the given conditions that could be other variables of a patient or appointment such as range of birthdays.
-
Currently, patients with the same name but different amount of spacings, e.g.
John DoeandJohn Doewith 2 spaces, are allowed to be added into the application. We plan to add a validation that will ignore extra spaces when checking for duplicate names.
Appendix: Effort
Difficulty Level
MediFlowR is a brown-field project that has been inspired from and based upon AB3. We have modified AB3’s existing model, Person, to accommodate our Patient records management. Moreover, we have extended the Person model to create an Appointments model to keep track of the appointments scheduled for the patients. Having 2 models (Person and Appointment) in MediFlowR that interact with each other has made it more complex than AB3. Moreover, we have incorporated Priority Tags into the Appointments model which allows for triaging (sorting) of the appointments. The Appointment model brings additional complexity to the project while also improving its functionality by facilitating interaction between both models.
Challenges
During the initial phase, understanding the codebase was difficult as we were not familiar with it. There were multiple dependencies and layers of abstraction which made it difficult to understand the flow of the project. As time went by, we became more adept at understanding the underlying mechanism to tweak the program and finding bugs in the AB3 program. As we added more functionalities, more dependencies were introduced and the program became increasingly complicated. In light of that we focussed on developing a user-centric, intuitive interface that is direct. For example, under a healthcare system’s standpoint, we wanted to include a variety of ways for users to search for information (through patient name, illness, today’s appointments, etc.). The command words used were designed in a way that the user had to conscientiously specify the way they intended to search.