User Guide
MediFlowR
Welcome to MediFlowR
Too many patients to handle? Mixing up your patient appointments?
Don’t worry, we got you! Taking control of your patient records management is now made easier with MediFlowR, and this user guide will help you master the application in no time!
About MediFlowR:
MediFlowR is a desktop application built for medical practitioners to manage their day-to-day operations. It is a user-friendly and efficient patient records management system designed to help you streamline your patient management processes. In the fast-paced world of healthcare, we understand the importance of keeping patient information organised and appointments on track. MediFlowR is your solution!
Key Features:
To simplify your administrative tasks, our application provides a range of features, but not limited to:
- Patient Information Management: Easily store, access and edit patient data, making it simple to track patient’s vital information and history.
- Appointment Scheduling: Efficiently manage patient appointments and eliminate the risk of scheduling conflicting appointments.
- Integration: Seamlessly integrate patient records across multiple departments by allowing users to update patient information, allowing for the doctor to follow up and ensuring continuity of care.
Here at MediFlowR, we believe in keeping things simple and efficient.
Simple: Navigating MediFlowR is a breeze. Our intuitive user interface just displays essential information allowing you to quickly access the information you need. Moreover, this user guide together with the in-application guidance minimises the learning curve for your administrative staff.
Efficient: On top of these functionalities, we believe that patient management must be efficient. Therefore, MediFlowR is optimised for keyboard users. By simply typing, MediFlowR can get your hospital management tasks done faster than the other apps in the industry.
Table of Contents
Glossary
Here are some common terms that you might encounter throughout the user guide:
| Term | Meaning |
|---|---|
| Command | The instruction that you enter into the application |
| Parameter | The additional information provided when you enter a command |
| Attribute | The particular information of the patient/appointment you want to access |
| Index | The position a patient/appointment is at on the patients records/appointments list |
Here are some common icons that you might see throughout the user guide:
| Icons | Meaning |
|---|---|
|
|
Provides you with the format used for a command |
|
|
Provides you with an example on how to use a command |
|
|
Provides you with some additional information on the inputs for a command |
|
|
Provides you with small tips to improve your experience using the application |
|
|
Warns you on the potential dangers of not using a command properly |
Here are some common formats that you need to follow when entering commands:
| Format | Meaning |
|---|---|
WORDS_IN_CAPITAL_LETTERS |
The parameters of a command |
[Words between square brackets] |
The parameters that are not necessary for the command to run (i.e. the optional parameters) |
Return to the Table of Contents
Navigating the application
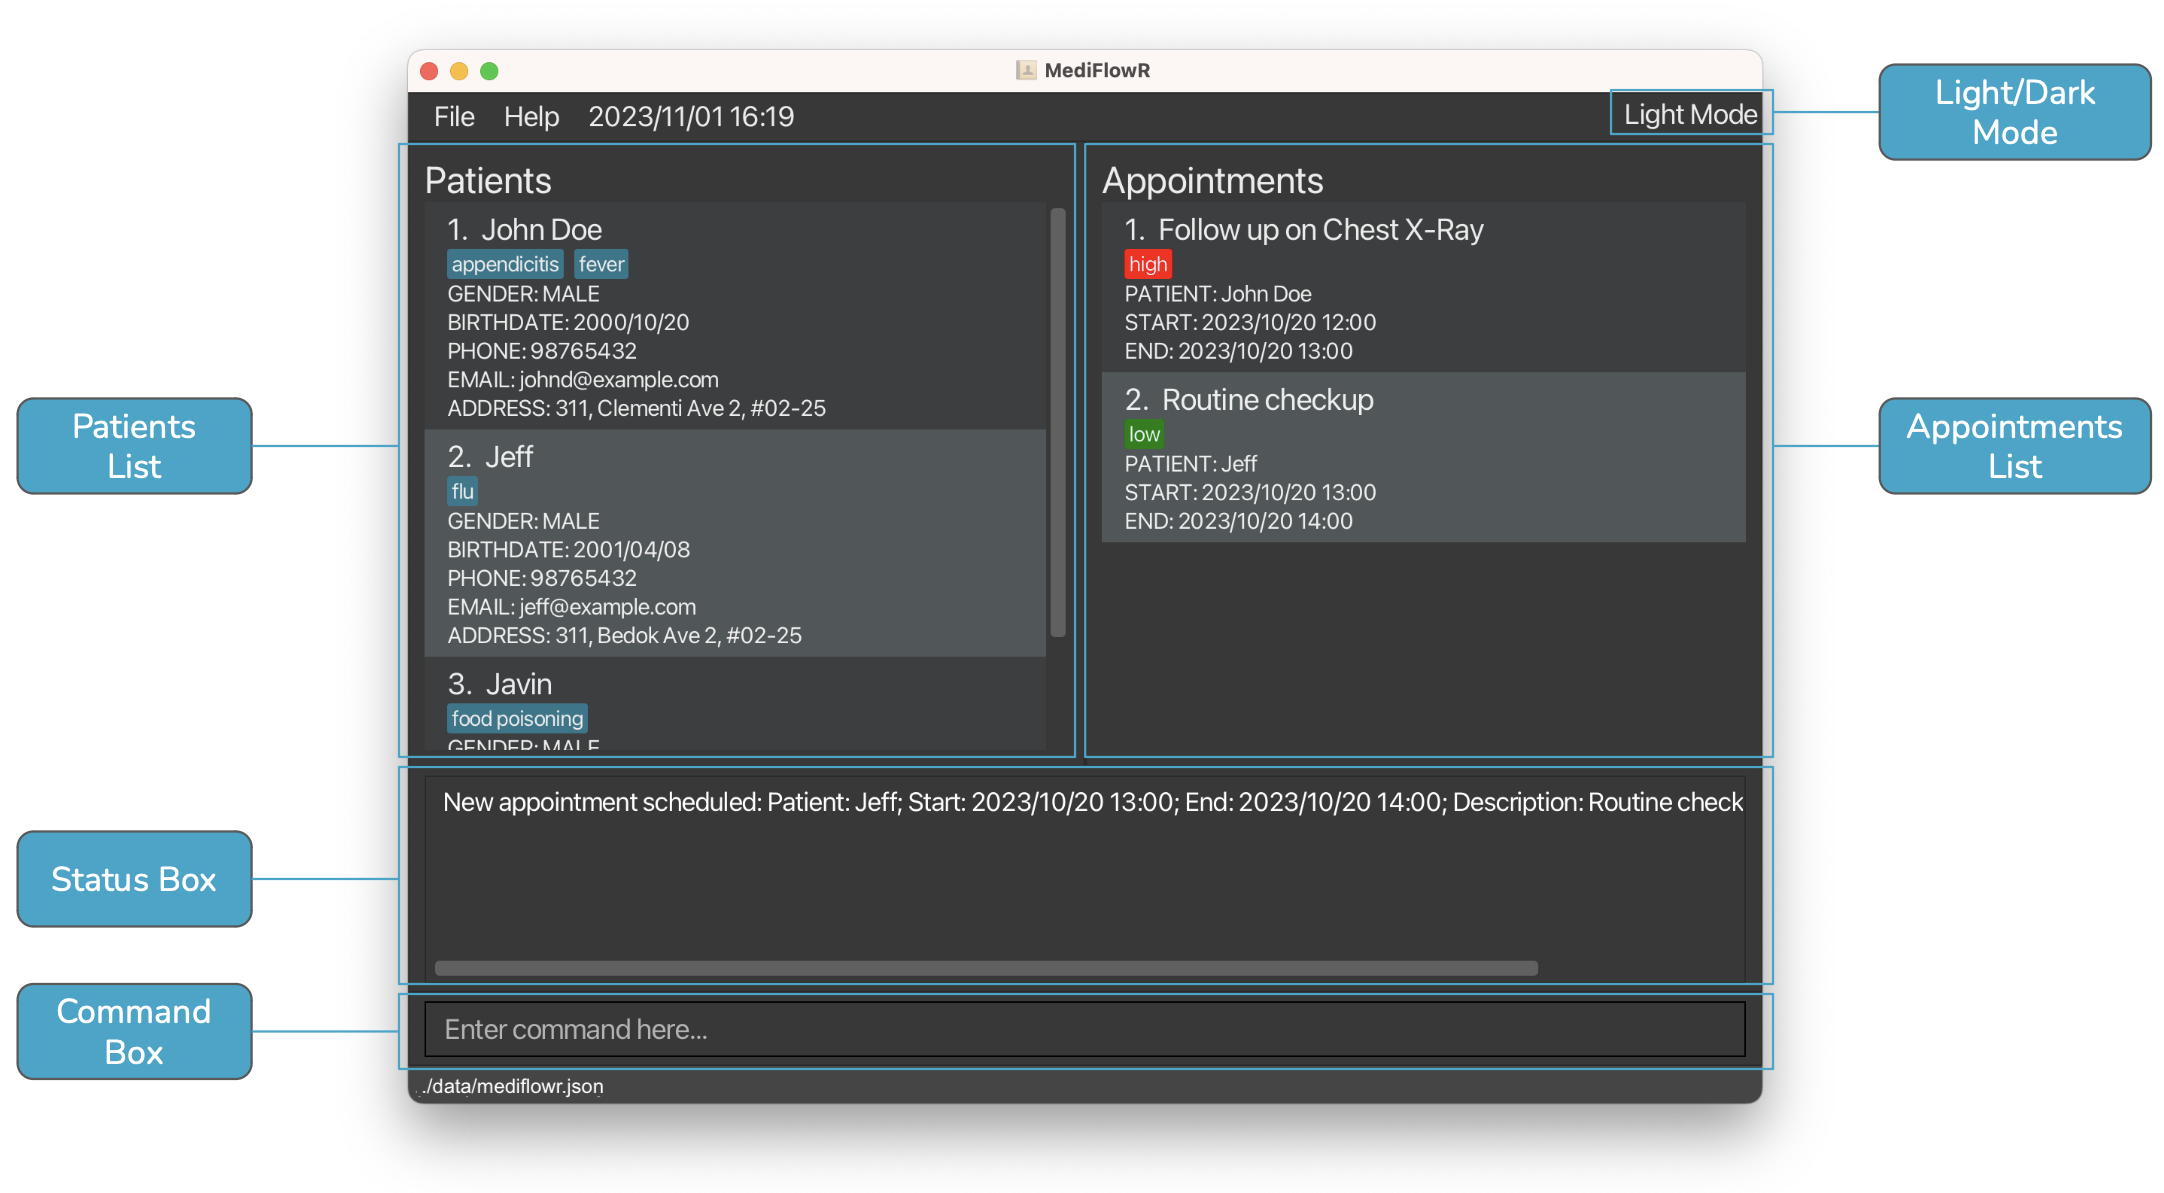
| Name | Function |
|---|---|
| Patients List | Displays patient records |
| Appointments List | Displays appointments that are scheduled |
| Status Box | Displays the results after a command is executed |
| Command Box | For you to enter the commands |
Return to the Table of Contents
Quick start
-
Ensure you have Java
11or above installed in your Computer.- To check your Java version, open Command Prompt if you are on Windows, or Terminal if you are on MacOS, and run
java --version. If you do not have Java installed, you can install it here.
- To check your Java version, open Command Prompt if you are on Windows, or Terminal if you are on MacOS, and run
-
Download the latest
mediflowr.jarfrom here. -
Create a folder in the location where you want the application to stay in, and copy the file into that folder.
- This is necessary as the application will create additional files to store settings and the data itself, so this will nicely organise the files.
-
If you are familiar with Command Prompt on Windows or Terminal on MacOS, navigate to the folder that you have just created using
cdcommand and open the application using thejava -jar mediflowr.jarcommand.- If you are not familiar, follow the instructions listed here.
-
You should now be able to use the application.
Return to the Table of Contents
Tutorial for new users
If this is your first time using MediFlowR, do not worry as this is a tutorial for you to get familiar with the features of MediFlowR. Please follow the instructions here first to set up the application before proceeding with the tutorial.
-
Launch the MediFlowR application. If you are not able to launch the application, follow the instructions here. You will see the screen as shown above.
- Note: When the application is first launched, it will contain some default patient records.
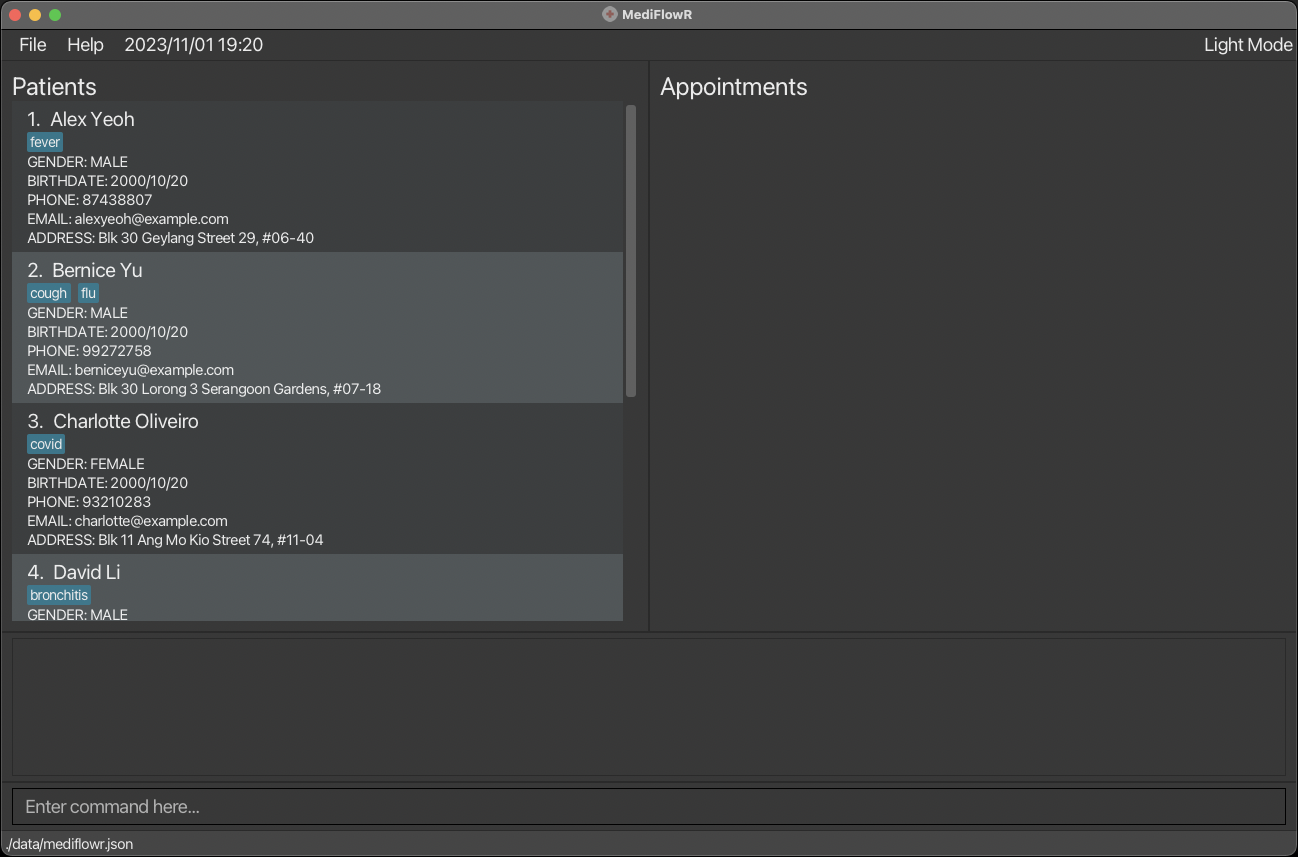
- Let us try adding a patient into our patient records. Enter the command
add name=John Doe gender=MALE birthdate=2000/10/20 phone=98765432 email=johnd@example.com address=311, Clementi Ave 2, #02-25 illnesses=Feverin the command box.

-
You should get this result screen. Scroll down in the patients list to confirm that patient John Doe has indeed been added. Try adding a few more patients into the patient records with the same format to familiarise yourself with the command.
-
Let us try editing a patient in our patient records. Enter the command
edit 7 birthdate=2001/12/14 phone=93842738in the command box.
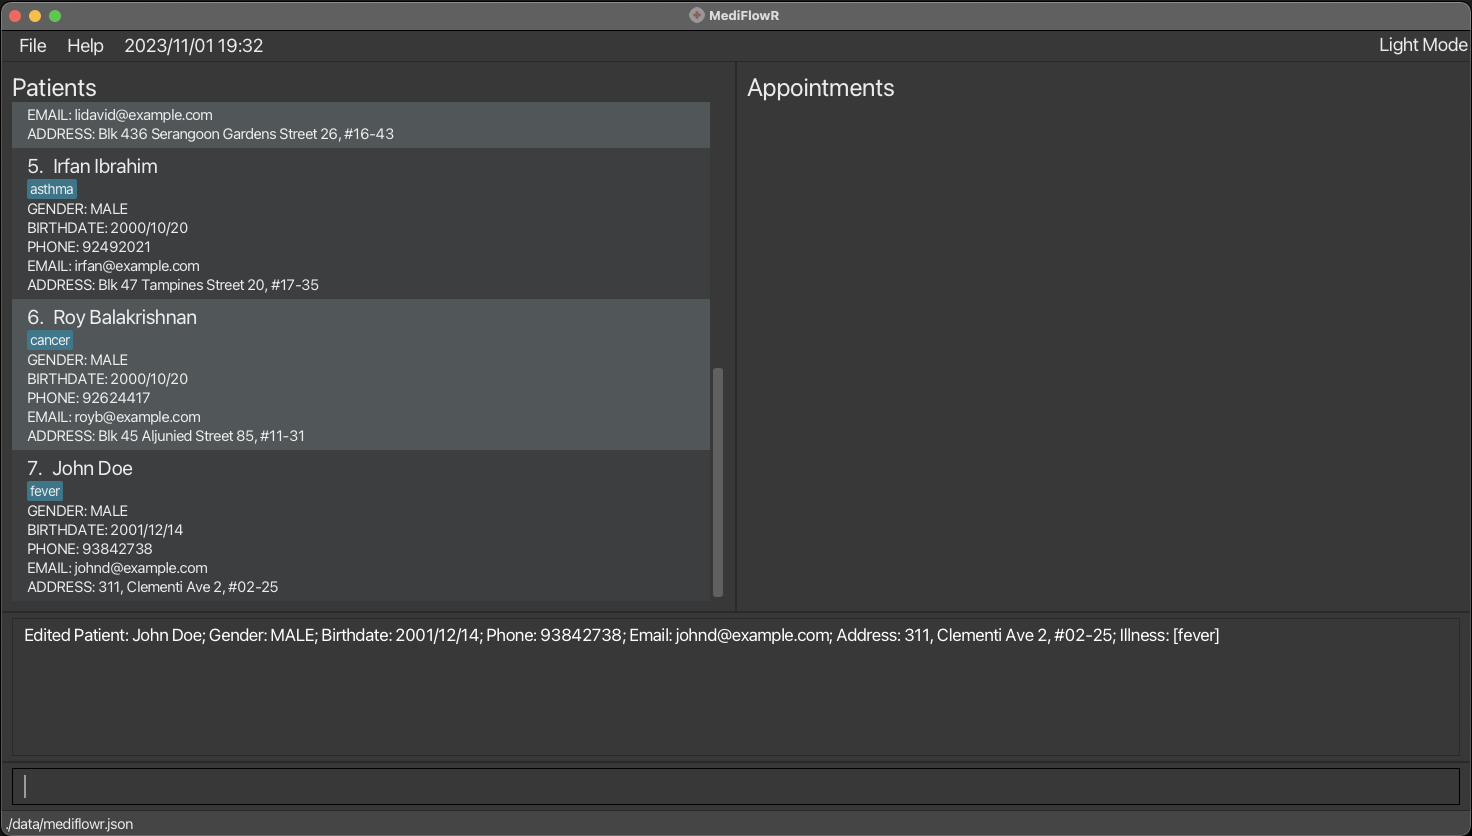
- You should get this result screen. Scroll down in the patients list to confirm that the birthdate and phone of patient John Doe have indeed been edited. Try editing other attributes or editing other patients to familiarise yourself with the command.
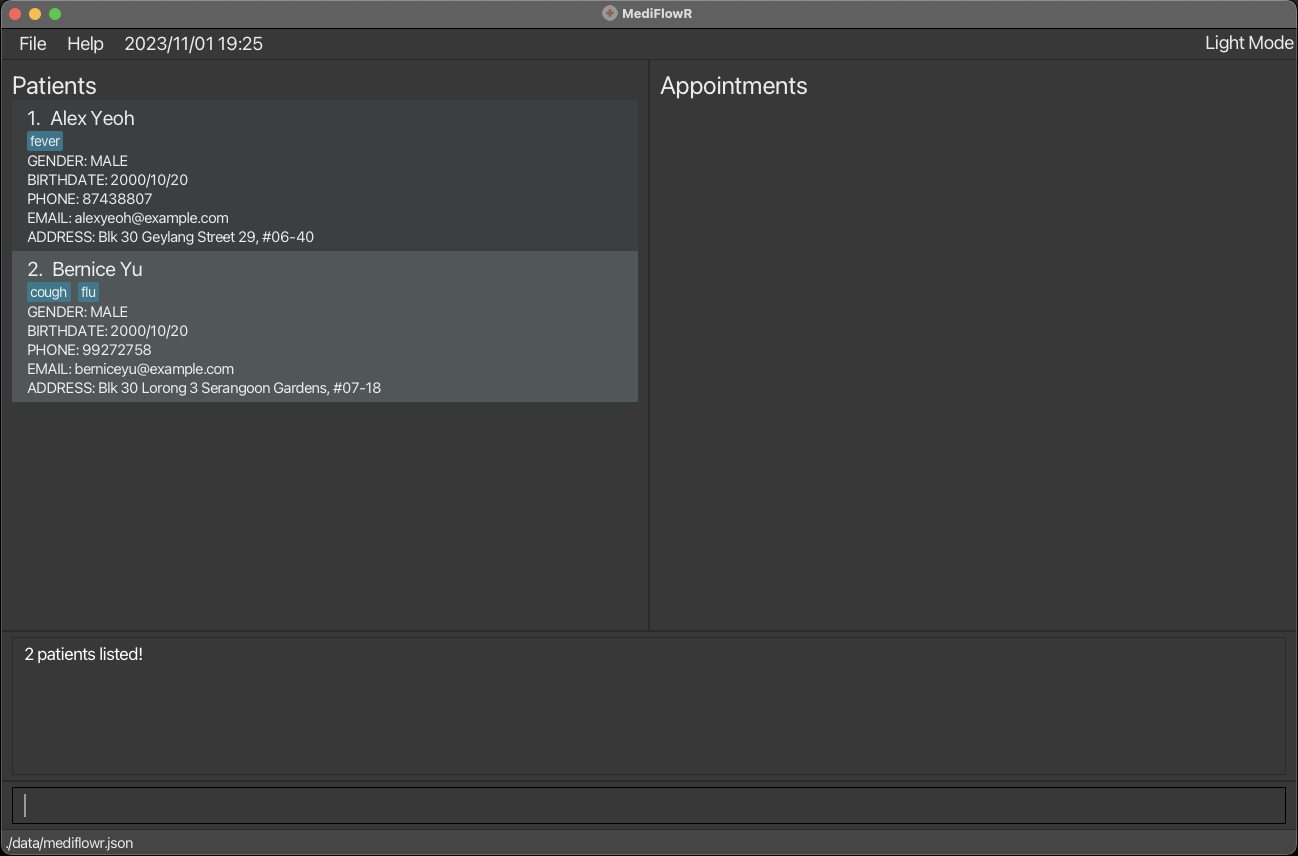
- Let us try finding a patient. Enter the command
find-p alex bernicein the command box.
-
You should get this result screen. This command will find all patients with either the name
alexorbernice. -
Let us try scheduling an appointment now that we have a patient in our records. Enter the command
schedule patient=John Doe start=2023/10/20 12:00 end=2023/10/20 13:00 description=Follow up on Chest X-Ray priority=highin the command box.
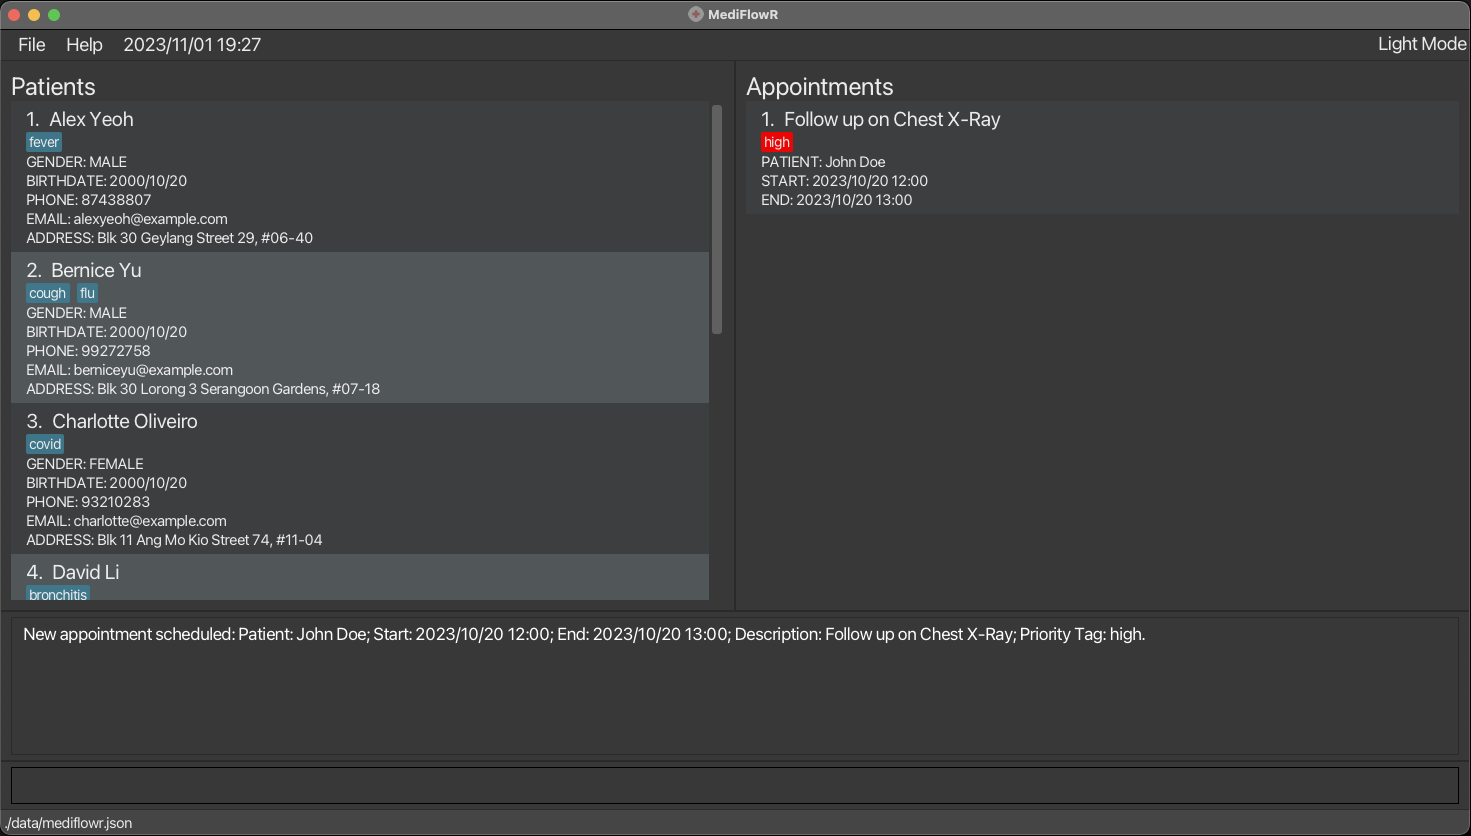
- You should get this result screen. This will schedule a new appointment for the patient with the name
John Doe. Try scheduling a few more appointments with the same format to familiarise yourself with the command.
- Let us try rescheduling the appointment that we have just scheduled. Enter the command
reschedule 1 start=2023/05/02 09:00 end=2023/05/02 11:00in the command box.
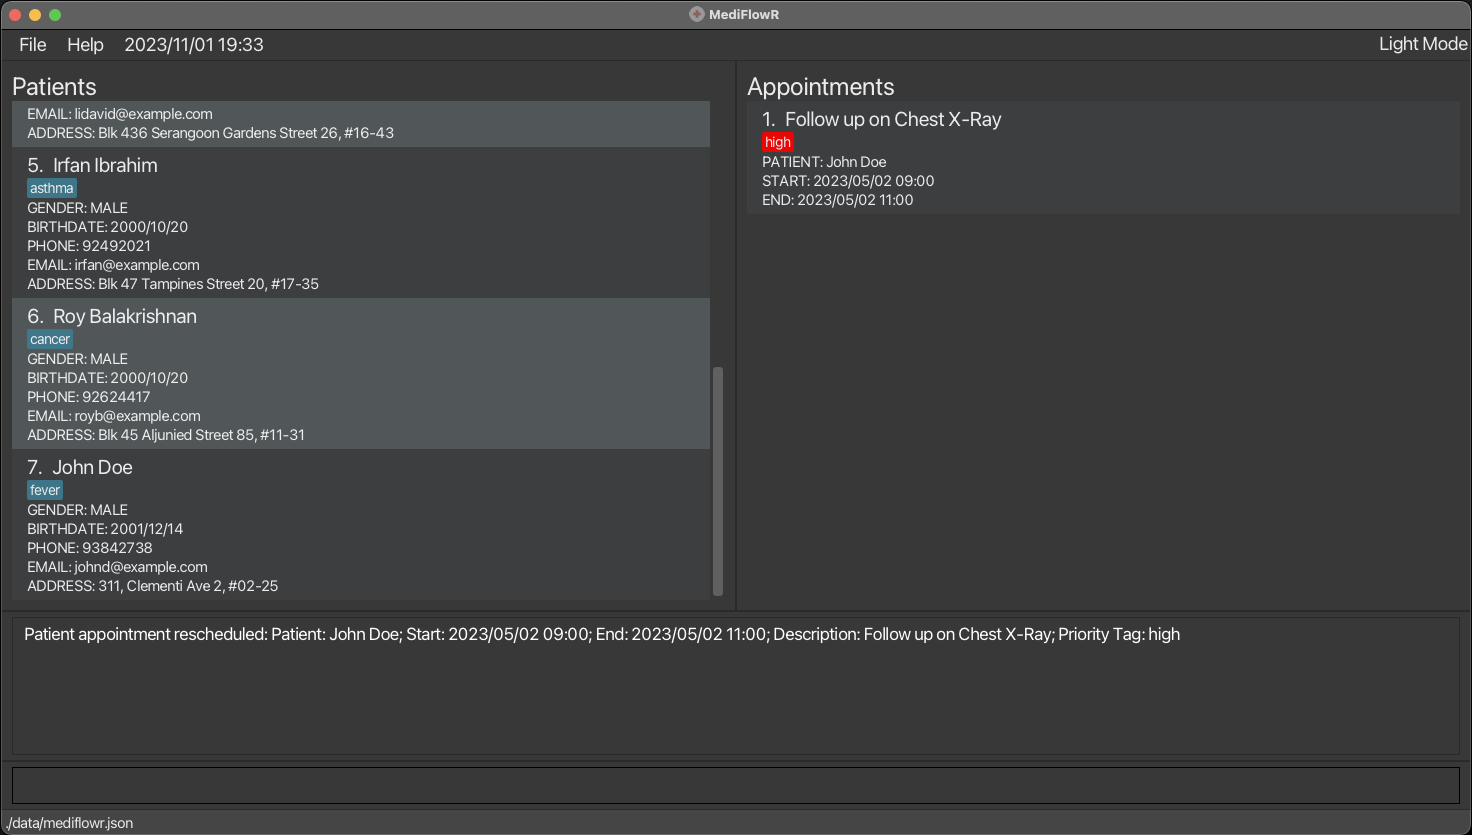
-
You should get this result screen. This will reschedule the appointment to start on
2023/05/02 09:00and end on2023/05/02 11:00. Try rescheduling the appointment to other timings or rescheduling other appointments to familiarise yourself with the command. -
Congratulations! You have completed the tutorial. You are now ready to use MediFlowR. Enter the command
clearto clear all patient records and appointments. You can learn more about the different commands here.
Return to the Table of Contents
Features
MediFlowR provides a variety of commands for you to effectively manage your patient records and appointments. This section will clearly guide you on how to use the commands so that you can streamline your workflow and take full advantage of the features present in this application.
Patient commands
Adding a new patient: add
This command creates a new patient to be added to the patient records, along with the necessary personal information and contact details about the patient.
![]() Format:
Format: add name=NAME gender=GENDER birthdate=BIRTHDATE phone=PHONE email=EMAIL address=ADDRESS [illnesses=ILLNESS]
![]() Example:
Example: add name=John Doe gender=MALE birthdate=2000/10/20 phone=98765432 email=johnd@example.com address=311, Clementi Ave 2, #02-25 illnesses=fever
The example command will add a male patient called John Doe, with birthdate on 20 October 2000, phone number at 98765432, email at johnd@example.com and address at 311, Clementi Ave 2, #02-25, who is currently down with fever.
![]() Notes:
Notes:
-
A patient’s name can only consist of letters and numbers.
-
A patient’s gender can only be
MALEorFEMALE. -
A patient’s birthdate must be in the format
yyyy/MM/dd, e.g.2001/04/28for a birthdate on 28 April 2001. -
A patient’s phone must be a valid phone number, i.e. only contains numbers.
-
A patient’s email must be a valid email address, i.e. of the form
name@domain.com. -
A patient’s illness can only consist of letters and numbers.
-
You do not have to enter the illness when adding a patient.
illnesses=fever, flu will add both fever and flu as a patient’s illnesses.
Return to the Table of Contents
Updating a patient’s details: edit
This command updates a patient’s personal information and contact details. It will update the details of the patient at
the specified INDEX currently shown in the patients records. You must edit at least one detail when using the command.
![]() Format:
Format: edit INDEX [name=NAME] [gender=GENDER] [birthdate=BIRTHDATE] [phone=PHONE] [email=EMAIL] [address=ADDRESS]
![]() Example:
Example: edit 1 birthdate=2001/12/14 phone=93842738
This example command will update the patient with index 1 in the patient records (i.e. the first patient) and will change the patient’s birthdate to 2001/12/14 and phone number to 93842738.
![]() Notes:
Notes:
-
The index provided must be a positive integer and a valid index.
-
You must edit at least one detail when using the command.
-
A patient’s name can only consist of letters and numbers.
-
A patient’s gender can only be
MALEorFEMALE. -
A patient’s birthdate must be in the format
yyyy/MM/dd, e.g.2001/04/28for a birthdate on 28 April 2001. -
A patient’s phone must be a valid phone number, i.e. only contains numbers.
-
A patient’s email must be a valid email address, i.e. of the form
name@domain.com. -
You do not have to enter the illness when adding a patient.
Return to the Table of Contents
Diagnosing a patient: diagnose
This command adds one or more illnesses to a patient’s current illnesses. It will update the details of the patient at
the specified INDEX currently shown in the patients records.
![]() Format:
Format: diagnose INDEX illnesses=ILLNESS
![]() Example:
Example: diagnose 1 illnesses=fever
![]() Notes:
Notes:
-
The index provided must be a positive integer and a valid index.
-
A patient’s illness can only consist of letters and numbers.
This example command will update the patient with index 1 in the patient records (i.e. the first patient) and will add fever to the patient’s illnesses.
illnesses=fever, flu will add both fever and flu as a patient’s illnesses.
Return to the Table of Contents
Undiagnosing a patient: undiagnose
This command removes one or more illnesses to a patient’s current illnesses. It will update the details of the patient at
the specified INDEX currently shown in the patients records.
![]() Format:
Format: undiagnose INDEX illnesses=ILLNESS
![]() Example:
Example: undiagnose 1 illnesses=fever
![]() Notes:
Notes:
-
The index provided must be a positive integer and a valid index.
-
A patient’s illness can only consist of letters and numbers.
This example command will update the patient with index 1 in the patient records (i.e. the first patient) and will remove fever from the patient’s illnesses.
illnesses=fever, flu will remove both fever and flu from a patient’s illnesses.
Return to the Table of Contents
Removing a patient: delete
This commands removes the specified patient from the patient list. It will remove the patient at
the specified INDEX currently shown in the patients records.
![]() Format:
Format: delete INDEX
![]() Example:
Example: delete 1
This example command will remove the patient with index 1 in the patient records (i.e. the first patient).
![]() Notes:
Notes:
- The index provided must be a positive integer and a valid index.
Return to the Table of Contents
Displaying all patients: patients
This command shows a list of all patients currently recorded in the MediFlowR application under the patients section.
![]() Format:
Format: patients
Return to the Table of Contents
Finding patients by name: find-p
This command finds patients whose names contain any of the keywords that you specified.
![]() Format:
Format: find-p NAME
![]() Example:
Example: find-p alex david
This example command will find all patients with names that contain either alex or david, e.g. Alex Yeoh and David Li.
![]() Notes:
Notes:
-
The search is case-insensitive, meaning that finding patients with the keyword
Johnwill return the same results as the keywordjohn. -
Only patients with names matching the full words of the keywords will be displayed, meaning that
Tomwill find patients with names that contain the fullTombut will not find patients with names such asTommy.
Return to the Table of Contents
Finding patients by illness: find-i
This command finds patients with illnesses that contain any of the keywords that you specified.
![]() Format:
Format: find-i ILLNESS
![]() Example:
Example: find-i fever flu
This example command will find all patients with illnesses that contain either fever or flu.
![]() Notes:
Notes:
-
The search is case-insensitive, meaning that finding illnesses with the keyword
feverwill return the same results as the keywordFeverorFEVER. -
Patients with illnesses that even contains the keywords will be displayed, meaning that
fluwill find both patients with illnesses that contain the fullfluillness and also patients with illnesses such asinfluenza.
Return to the Table of Contents
Sorting patients: sort-p
This command sorts the patients list by name or birthday, in ascending or descending order.
![]() Format:
Format: sort-p DIRECTION by=ATTRIBUTE
![]() Example:
Example: sort-p asc by=name
This example command will sort the patients by the names in ascending order.
![]() Notes:
Notes:
-
This command will sort all patients in the application, but it will only display the patients that are currently displayed. E.g. If you had just used the command
find-pto find patients by name, this command will only display the patients that were found by the previous command. So to view the full sorted list, follow up with the commandlist. -
The direction can only be
ascordesc, i.e. ascending or descending order respectively. -
The attribute to sort the patients by can only be
nameorbirthday.
Return to the Table of Contents
Appointment Commands
Scheduling a new appointment: schedule
This command schedules an appointment for an existing patient in the patient records. It will schedule an appointment
for the patient with the name PATIENT.
![]() Format:
Format: schedule patient=PATIENT start=START end=END description=DESCRIPTION priority=PRIORITY
![]() Example:
Example: schedule patient=Alex Yeoh start=2023/10/20 12:00 end=2023/10/20 13:00 description=Follow up on Chest X-Ray priority=high
This example command will schedule a new high priority appointment for the patient Alex Yeoh on 20 October 2023 from 12pm to 1pm for his follow-up appointment on his chest X-Ray.
![]() Notes:
Notes:
-
The patient provided for an appointment must exactly match the full name of a patient that is already in the patient records (case-sensitive).
-
An appointment start and end must be in the format
yyyy/MM/dd HH:mm, e.g.2023/04/28 19:00for 28 April 2023, at 7pm. -
An appointment start date time should occur before end date time of the same appointment.
-
An appointment description can only consist of letters and numbers.
-
An appointment priority can only be
high,medium, orlow.
Return to the Table of Contents
Rescheduling an appointment: reschedule
This command reschedules an existing appointment to another timeslot. It will reschedule the appointment at the specified
INDEX currently shown in the appointments list.
![]() Format:
Format: reschedule INDEX start=START end=END
![]() Example:
Example: reschedule 1 start=2023/05/02 09:00 end=2023/05/02 11:00
This example command will reschedule the appointment with index 1 in the appointments list (i.e. the first appointment) to 2 May 2023, from 9am to 11am.
![]() Notes:
Notes:
-
The index provided must be a positive integer and a valid index.
-
You must specify both start and end when using the command.
-
The patient provided for an appointment must exactly match the full name of a patient that is already in the patient records.
-
An appointment start and end must be in the format
yyyy/MM/dd HH:mm, e.g.2023/04/28 19:00for 28 April 2023, at 7pm. -
An appointment start date time should occur before end date time of the same appointment.
-
An appointment description can only consist of letters and numbers.
-
An appointment priority can only be
high,medium, orlow.
Return to the Table of Contents
Triaging an appointment: triage
This command changes the priority of an existing appointment. It will change the appointment at the specified
INDEX currently shown in the appointments list.
![]() Format:
Format: triage INDEX priority=PRIORITY
![]() Example:
Example: triage 1 priority=high
This example command will change the priority of the appointment with index 1 in the appointments list (i.e. the first appointment) to high.
![]() Notes:
Notes:
-
The index provided must be a positive integer and a valid index.
-
An appointment priority can only be
high,medium, orlow.
Return to the Table of Contents
Cancelling an appointment: cancel
This command cancels an existing appointment. It will cancel the appointment at the specified
INDEX currently shown in the appointments list.
![]() Format:
Format: cancel INDEX
![]() Example:
Example: cancel 1
This example command will cancel the appointment with index 1 in the appointments list (i.e. the first appointment).
![]() Notes:
Notes:
- The index provided must be a positive integer and a valid index.
Return to the Table of Contents
Displaying all appointments: appointments
This command shows a list of all appointments currently scheduled.
![]() Format:
Format: appointments
Return to the Table of Contents
Finding appointments by patient name: find-a
This command finds appointments with patient names that contain any of the keywords that you specified.
![]() Format:
Format: find-a PATIENT
![]() Example:
Example: find-a alex david
This example command will find all appointments with patient names that contain either alex or david, e.g. Alex Yeoh or David Li.
![]() Notes:
Notes:
-
The search is case-insensitive, meaning that finding appointments with the keyword
Johnwill return the same results as the keywordjohn. -
Only appointments with patient names matching the full words of the keywords will be displayed, meaning that
Tomwill find patients with names that contain the fullTombut will not find patients with names such asTommy.
Return to the Table of Contents
Displaying all appointments for today: today
This command shows a list of all appointments currently scheduled to start today, i.e. the current date you are using the command on.
![]() Format:
Format: today
Return to the Table of Contents
Displaying all upcoming appointments: upcoming
This command shows a list of all upcoming appointments currently scheduled.
![]() Format:
Format: upcoming
Return to the Table of Contents
Sorting appointments: sort-a
This command sorts the appointments list by date or priority, in ascending or descending order.
![]() Format:
Format: sort-a DIRECTION by=ATTRIBUTE
![]() Example:
Example: sort-a asc by=time
This example command will sort the appointments by the times in ascending order.
![]() Notes:
Notes:
-
This command will sort all appointments in the application, but it will only display the appointments that are currently displayed. E.g. If you had just used the command
find-ato find appointments by patient name, this command will only display the appointments that were found by the previous command. -
The direction can only be
ascordesc, i.e. ascending or descending order respectively. -
The attribute to sort the appointments by can only be
timeorpriority.
Return to the Table of Contents
Miscellaneous commands
Displaying all patient records and appointments: list
This command displays all patient records and appointments.
![]() Format:
Format: list
Return to the Table of Contents
Undoing a previous command: undo
This command undoes a previous command.
![]() Format:
Format: undo
![]() Notes:
Notes:
- The
modecommand cannot be undone using this command, as you can simply type mode again to toggle the dark/light mode.
Return to the Table of Contents
Redoing a previous command: redo
This command redoes a previous command that you undid.
![]() Format:
Format: redo
![]() Notes:
Notes:
- The
modecommand cannot be redone using this command, as you can simply type mode again to toggle the dark/light mode.
Return to the Table of Contents
Clearing all records: clear
This command clears all patient records and appointments from the application.
![]() Format:
Format: clear
Return to the Table of Contents
Toggling dark/light mode: mode
This command toggles the dark/light mode for the application.
![]() Format:
Format: mode
Return to the Table of Contents
Exiting the program: exit
This command exits the program.
![]() Format:
Format: exit
Return to the Table of Contents
Viewing help: help
Shows a message explaining how to access the help page.

![]() Format:
Format: help
Return to the Table of Contents
Commands summary
| Action | Format, Examples |
|---|---|
| Adding a new patient |
add name=NAME gender=GENDER birthdate=BIRTHDATE phone=PHONE email=EMAIL address=ADDRESS [illness=ILLNESS] e.g., add name=John Doe gender=MALE birthdate=2000/10/20 phone=98765432 email=johnd@example.com address=311, Clementi Ave 2, #02-25 illnesses=fever
|
| Updating a patient’s details |
edit INDEX [name=NAME] [gender=GENDER] [birthdate=BIRTHDATE] [phone=PHONE] [email=EMAIL] [address=ADDRESS] e.g., edit 1 birthdate=2001/12/14 phone=93842738
|
| Diagnosing a patient |
diagnose INDEX illnesses=ILLNESSe.g., diagnose 1 illnesses=fever
|
| Undiagnosing a patient |
undiagnose INDEX illnesses=ILLNESSe.g., undiagnose 1 illnesses=fever
|
| Removing a patient |
delete INDEXe.g., delete 1
|
| Displaying all patients | patients |
| Finding patients by name |
find-p NAMEe.g., find-p alex david
|
| Finding patients by illness |
find-i ILLNESSe.g., find-i fever flu
|
| Sorting patients |
sort-p DIRECTION by=ATTRIBUTEe.g., sort-p asc by=name
|
| Scheduling a new appointment |
schedule patient=PATIENT start=START end=END description=DESCRIPTION priority=PRIORITY e.g., schedule patient=Alex Yeoh start=2023/10/20 12:00 end=2023/10/20 13:00 description=Follow up on Chest X-Ray priority=high
|
| Rescheduling an appointment |
reschedule INDEX start=START end=ENDe.g., reschedule 1 start=2023/05/02 09:00 end=2023/05/02 11:00
|
| Triaging an appointment |
triage INDEX priority=PRIORITYe.g., triage 1 priority=high
|
| Cancelling an appointment |
cancel INDEXe.g., cancel 1
|
| Displaying all appointments | appointments |
| Finding appointments by patient name |
find-a PATIENTe.g., find-a alex david
|
| Displaying all appointments for today | today |
| Displaying all upcoming appointments | upcoming |
| Sorting appointments |
sort-a DIRECTION by=ATTRIBUTEe.g., sort-a asc by=time
|
| Displaying all patient records and appointments | list |
| Undoing a previous command | undo |
| Redoing a previous command | redo |
| Clearing all patient records | clear |
| Toggling dark/light mode | mode |
| Exiting the program | exit |
| Viewing help | help |
Return to the Table of Contents
FAQ
Q: How do I launch the MediFlowR application?
A: The easiest way is to double-click the mediflowr.jar file and the application should launch. If that does not work,
follow the steps here:
- Open Command Prompt if you are on Windows, or open Terminal if you are on MacOS.
- Navigate to the directory that contains the
mediflowr.jarfile using thecdcommand. For example, if the file is located atC:\Users\YourUserName\Downloadson Windows or~/Downloadson MacOS, you can enter the commandcd C:\Users\YourUserName\Downloadsorcd ~/Downloadsto navigate to that directory. - Open the
mediflowr.jarfile using the commandjava -jar mediflowr.jar. The application should launch afterwards.
Q: How do I transfer my data to another Computer?
A: You can install MediFlowR on that other computer, then simply transfer over the mediflowr.json file located in the
data folder to the data folder on that other computer. The data folder is located at the same place as your MediFlowR application.
Q: How do I save my data after any changes I have made?
A: The data is saved automatically after any command that changes the data. There is no need to save manually.
Q Can I edit the data file used by the application directly?
A: MediFlowR data are saved automatically as a JSON file [JAR file location]/data/mediflowr.json. Advanced users are welcome to update data directly by editing that data file.
Return to the Table of Contents
Known issues
-
When using multiple screens, if you move the application to a secondary screen, and later switch to using only the primary screen, the application will open off-screen. The remedy is to delete the
preferences.jsonfile created by the application, located in the same folder as the application, before running the application again.
Return to the Table of Contents